Hydrangeas are lovely, versatile shrubs that come in a variety of colors and shapes. They can thrive in different climates, but their care requirements vary slightly depending on the type (such as Hydrangea macrophylla, Hydrangea paniculata, or Hydrangea quercifolia). Here’s a general care guide for hydrangeas:
1. Location and Light
- Ideal Light: Most hydrangeas prefer partial shade, especially in warmer climates. A spot that gets morning sun and afternoon shade is ideal. Full sun is okay for some varieties (like Hydrangea paniculata), but too much can cause wilting or leaf burn, especially in hotter regions.
- Some Varieties Tolerate Full Sun: If you’re in a cooler climate, you might be able to grow hydrangeas in full sun without issues, especially the paniculata types, which can handle more direct sunlight.
2. Watering
- Consistent Moisture: Hydrangeas like consistent moisture, but the soil should be well-draining. They don’t do well in overly dry conditions or waterlogged soil. Water deeply to ensure the roots get enough moisture.
- Check Soil Moisture: If the soil feels dry an inch or two below the surface, it’s time to water. During hot spells, you may need to water more frequently, but make sure the soil isn’t soggy.
- Mulching: A layer of mulch around the base helps retain moisture, regulate soil temperature, and prevent weeds.
3. Soil
- Well-Draining, Moist Soil: Hydrangeas prefer rich, loamy, slightly acidic to neutral soil (pH 5.5 to 6.5). If your soil is too alkaline, you might need to amend it with organic matter or soil acidifiers like sulfur.
- Soil pH Affects Flower Color: For Hydrangea macrophylla, the soil pH can affect the bloom color. Acidic soil tends to produce blue flowers, while alkaline soil can produce pink flowers.
4. Fertilizing
- Feed Regularly in Spring and Summer: Hydrangeas are moderate feeders. Use a balanced, slow-release fertilizer in early spring as new growth begins, and again in mid-summer to support the bloom cycle.
- Avoid Over-Fertilizing: Too much fertilizer can lead to excessive foliage growth at the expense of blooms. Follow the recommended dosage on the fertilizer package.
- Organic Matter: You can also amend the soil with compost to provide slow, steady nutrients throughout the growing season.
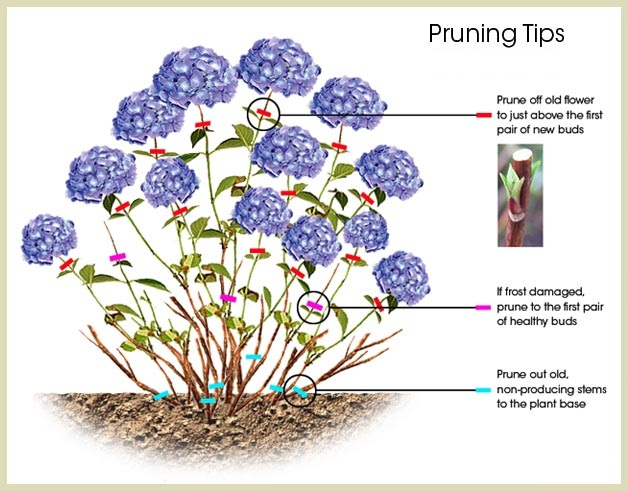
5. Pruning
- Know Your Hydrangea Type: Different hydrangeas have different pruning needs.
- Hydrangea macrophylla (Bigleaf Hydrangea): Prune in late winter or early spring before new growth begins. Avoid pruning old wood if you want to maintain flowers from the previous year (as they bloom on old wood).
- Hydrangea paniculata (Panicled Hydrangea): These bloom on new wood, so they can be pruned back in late winter or early spring to encourage healthy new growth and larger blooms.
- Hydrangea quercifolia (Oakleaf Hydrangea): Prune after flowering, cutting back spent blooms and shaping the shrub.
- Deadheading: Remove spent flowers to keep the plant looking tidy, but be mindful not to remove buds that could bloom in the following season.
6. Winter Care
- Protection from Cold: In colder climates, hydrangeas can benefit from winter protection. Consider mulching heavily around the base to protect the roots, or covering the plant with burlap or a frost blanket if needed.
- Cut Back Dead Growth: For varieties that die back in winter, prune off any dead or damaged stems in spring once the danger of frost has passed.
7. Pests and Problems
- Common Pests: Aphids, scale insects, and spider mites can sometimes be a problem for hydrangeas. If you notice these pests, treat the plant with insecticidal soap or neem oil.
- Diseases: Hydrangeas are relatively disease-resistant but can sometimes suffer from powdery mildew, leaf spot, or botrytis blight. Good air circulation and avoiding overhead watering can help reduce the risk of fungal diseases.
8. Hydrangea Care by Variety
- Hydrangea macrophylla (Bigleaf Hydrangea): Blooms in early summer with large, round flower clusters. Prefers partial shade, regular watering, and consistent moisture.
- Hydrangea paniculata (Panicled Hydrangea): Grows tall with cone-shaped flowers that bloom late summer to fall. More sun-tolerant and hardy compared to other varieties.
- Hydrangea quercifolia (Oakleaf Hydrangea): Known for its large leaves that turn red in the fall, it blooms with cone-shaped flowers in early summer. Prefers partial shade and moist soil.
9. General Tips
- Avoid Overcrowding: Ensure your hydrangea has enough space to grow and isn’t shaded out by other plants. Crowded conditions can affect airflow, making the plant more susceptible to disease.
- Hydrangea in Containers: If you’re growing hydrangeas in containers, ensure that the pot is large enough and that there’s good drainage. Water the plant frequently, as container soil can dry out more quickly than garden soil.
Are you growing hydrangeas in a garden or container? Let me know if you have any specific issues or questions about your hydrangea care!
Caring for roses can be a rewarding experience! Here are some basic tips for keeping your rose plants healthy and blooming beautifully:
- Planting: Choose a spot that gets at least 6 hours of sunlight per day. Roses prefer well-drained soil, so make sure the area isn’t too soggy.
- Watering: Water roses deeply, about once a week, especially during dry spells. Avoid overhead watering to keep the leaves dry and prevent diseases. Water at the base of the plant early in the morning.
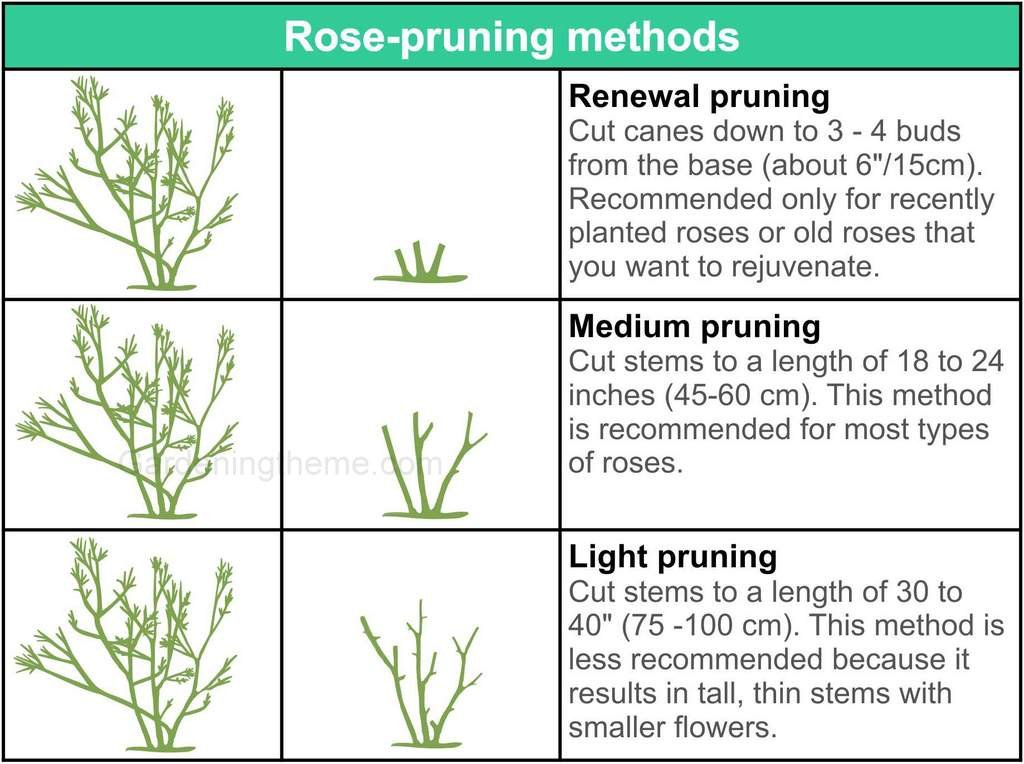
- Pruning: Prune dead or diseased wood, as well as any stems that are crossing or rubbing against each other. It’s usually done in late winter or early spring before new growth starts. Regular deadheading (removing spent blooms) helps promote new flowers.
- Fertilizing: Feed your roses with a balanced fertilizer that’s rich in potassium and phosphorus, and low in nitrogen. You can apply fertilizer in early spring, and again in mid-summer.
- Pest Control: Keep an eye out for pests like aphids, spider mites, or Japanese beetles. Use organic insecticides or natural predators like ladybugs to control them. Keep the area around the roses clear of debris.
- Mulching: Apply mulch around the base of the rose bush to conserve moisture, suppress weeds, and regulate soil temperature.
- Winter Care: In colder climates, protect your roses in the winter by mounding soil around the base and using burlap or rose cones to shield the plant from harsh winds and freezing temperatures.

Fertilizer plays a crucial role in supporting the health and growth of plants, both in gardens and indoor environments. By providing essential nutrients, fertilizer helps plants thrive, flower, and produce fruit. Here are some of the key benefits of using fertilizer for plants:
1. Provides Essential Nutrients
Plants need a variety of nutrients to grow, and fertilizer helps supply these nutrients that may be missing or insufficient in the soil. The primary nutrients in most fertilizers are:
- Nitrogen (N): Essential for healthy leaf and stem growth. It supports the development of chlorophyll, the green pigment in plants responsible for photosynthesis.
- Phosphorus (P): Important for root development, flower and fruit production, and overall plant energy transfer.
- Potassium (K): Enhances root health, strengthens the plant’s ability to resist disease, and helps with flowering and fruiting.
- Secondary Nutrients: Calcium, magnesium, and sulfur are also important for plant growth, improving things like cell wall strength and enzyme function.
- Micronutrients: Elements like iron, manganese, zinc, and copper support vital plant processes, even though they are needed in smaller amounts.
2. Promotes Strong Root Development
Phosphorus, in particular, is vital for developing a healthy root system. Healthy roots allow plants to better absorb water and nutrients from the soil. This is particularly helpful for young plants and newly planted trees or flowers, as it gives them a solid foundation to grow from.
3. Enhances Plant Growth and Vigorous Foliage
Fertilizers, especially those high in nitrogen, promote lusher and greener foliage. Nitrogen encourages leaf production and stem growth, which is ideal for leafy plants like lettuce, spinach, and ornamental foliage plants. Healthy leaves are vital for photosynthesis, which supports the plant’s overall energy production.
4. Increases Flowering and Fruit Production
Phosphorus and potassium are crucial for plants that are flowering or bearing fruit. Phosphorus helps plants form strong, healthy flowers, while potassium supports fruit ripening and overall plant stress resistance. Whether you’re growing flowers, vegetables, or fruit trees, using the right fertilizer encourages more blossoms and better yields.
5. Helps Plants Resist Disease and Stress
A well-fed plant is stronger and more resilient. Potassium, in particular, helps strengthen plant cell walls and enhances their ability to resist disease, pests, and extreme weather conditions like drought or frost. Fertilizing plants regularly helps them stay healthy and better equipped to handle environmental stressors.
6. Improves Soil Fertility
Adding fertilizer to the soil can improve soil structure, especially if you are using organic fertilizers. Organic fertilizers (like compost or manure) introduce beneficial microbes into the soil, which helps break down organic matter and makes it easier for plants to access nutrients. Over time, this boosts the soil’s natural fertility and creates a healthy, balanced environment for plant growth.
7. Encourages Faster Growth
Fertilizers speed up plant growth by providing them with the nutrients they need in higher quantities than naturally available in the soil. This is particularly helpful for plants that are in a hurry to grow, like vegetables, herbs, and annual flowers, or for indoor plants that need a little extra support in pots.
8. Prevents Nutrient Deficiencies
In some cases, soil may lack specific nutrients, leading to poor plant growth or visible signs of nutrient deficiencies. For example:
- Yellowing leaves may indicate a nitrogen deficiency.
- Stunted growth might be a sign of a phosphorus shortage.
- Weak stems could point to a potassium deficiency. Fertilizer helps prevent these deficiencies and correct issues before they become serious.
9. Helps in Container and Indoor Plant Care
Plants grown in pots or containers have limited access to nutrients, and the soil can quickly become depleted. Regular fertilization ensures that plants in containers, like houseplants, flowers, or herbs, receive the necessary nutrients to grow and thrive. For indoor plants, a balanced liquid fertilizer applied during the growing season can make a big difference in overall health.
10. Improves Appearance of Plants
Proper fertilization promotes not only better health but also more attractive plants. Vibrant colors, strong stems, and more abundant blooms are all the results of a balanced nutrient supply. Whether you’re growing flowers, shrubs, or trees, using the right fertilizer helps maintain an appealing garden or landscape.
Types of Fertilizers for Plants
- Granular Fertilizers: Slow-release or quick-release solid fertilizers that can be applied to the soil. They are often best for outdoor plants, flower beds, and vegetable gardens.
- Liquid Fertilizers: Fast-acting fertilizers that are dissolved in water and applied directly to the plant roots or leaves. They’re ideal for indoor plants, hanging baskets, or plants in containers.
- Organic Fertilizers: Made from natural materials (e.g., compost, manure, seaweed), they provide a gentle and steady release of nutrients while improving soil health.
- Synthetic Fertilizers: Manufactured fertilizers with a precise nutrient mix. They can provide immediate results but may not improve soil health in the long term.
Application Tips for Fertilizing Plants
- Follow instructions: Too much fertilizer can burn the roots or cause nutrient imbalances, so always follow the application instructions on the label.
- Water thoroughly: After applying fertilizer, make sure to water the plants well to help nutrients penetrate the soil and be absorbed by the roots.
- Time it right: Fertilize during the growing season (spring and summer) when plants are actively taking up nutrients. Avoid fertilizing in the dormant season (winter), as plants won’t be using nutrients.
- Check soil: Before fertilizing, consider conducting a soil test to see if your plants need specific nutrients, and adjust the fertilizer type accordingly.
In Summary:
Fertilizer is essential for promoting healthy growth, increasing flowering, and ensuring strong roots. It helps fill in nutrient gaps, improves resistance to disease, and encourages a more vibrant garden. Whether you are growing flowers, vegetables, or houseplants, using the right fertilizer will lead to a more lush, productive, and beautiful garden.
Are you looking for specific fertilizer recommendations for any of your plants? Feel free to let me know what types you’re growing, and I can help you choose the best one!
Wisteria is a fantastic flowering vine known for its dramatic, cascading flowers and ability to cover trellises, pergolas, and arbors in breathtaking color. There are several species and varieties of wisteria, each with its unique charm and growing requirements. Here’s a guide to popular wisteria varieties and how to care for them:
Wisteria Varieties:
1. Wisteria sinensis (Chinese Wisteria)
- Common Varieties:
- ‘Blue Moon’: Known for its fragrant blue-purple flowers that bloom twice a year.
- ‘Prolific’: This variety has a stronger bloom and is great for gardeners seeking a more prolific flowering wisteria.
- ‘Shiro Noda’: A white-flowered variety with elegant cascading blooms.
- ‘Alba’: Another white-flowered variety that’s fragrant and graceful.
- Characteristics: Chinese wisteria tends to have very large, showy flowers that grow in long clusters. It blooms in early spring, often before the foliage fully appears.
2. Wisteria floribunda (Japanese Wisteria)
- Common Varieties:
- ‘Rosea’: Soft pink flowers that offer a delicate look and great fragrance.
- ‘Longissima Alba’: A white-flowered variety known for its incredibly long flower clusters.
- ‘Violacea Plena’: This variety features double purple blooms and is slightly slower growing.
- ‘Shiro Noda’: A repeat bloomer with white flowers that are fragrant and delicate.
- Characteristics: Japanese wisteria has smaller, more fragrant flowers compared to Chinese wisteria. It blooms later in the spring or early summer, and its flowers often last longer.
3. Wisteria × formosa (Hybrid Wisteria)
- Common Varieties:
- ‘Blue Moon’: This hybrid is known for its blue-violet flowers and repeated blooms throughout the season. It’s one of the hardier varieties.
- Characteristics: This is a hybrid between Wisteria sinensis and Wisteria floribunda, which combines the traits of both species—long-lasting flowers and an extended blooming period.
4. Wisteria trellis varieties (Compact Varieties)
- Common Varieties:
- ‘Compresa’: A dwarf variety with compact growth, ideal for smaller spaces like patios or trellises.
- ‘Tuscany’: A more compact variety with deep blue flowers, good for smaller garden spaces.
- Characteristics: These are smaller, more controlled versions of wisteria that are easier to manage in smaller gardens or containers.
Wisteria Care Guide:
1. Planting Location
- Sunlight: Wisteria thrives in full sun (at least 6 hours per day). The more sun it receives, the more flowers it will produce.
- Soil: It prefers well-draining soil, slightly acidic to neutral (pH 6-7). Heavy, waterlogged soils can lead to root rot, so ensure good drainage. You can amend your soil with organic matter to improve drainage if needed.
- Space: Wisteria is a vigorous grower, so plant it in a location where it has plenty of room to spread, ideally 10–15 feet from structures or other plants to avoid crowding.
2. Watering
- New Plants: Water regularly while the plant establishes itself in its first year. Keep the soil moist but not waterlogged.
- Established Plants: Once established, wisteria is fairly drought-tolerant. Water deeply during dry spells but be careful not to overwater, as this can lead to root rot.
- Mulching: Apply mulch around the base of the plant to retain moisture and reduce weed competition. Keep the mulch away from the stem to avoid rot.
3. Fertilizing
- When to Fertilize: Fertilize wisteria in early spring as new growth begins. You can apply a second round of fertilizer in early summer if necessary.
- Type of Fertilizer: Use a balanced, slow-release fertilizer (such as 10-10-10) or a fertilizer specifically designed for flowering plants. Avoid high-nitrogen fertilizers as they promote leafy growth at the expense of flowers.
- Over-fertilization: Wisteria does not require heavy feeding. Too much nitrogen can lead to vigorous growth without flowers. Stick to a moderate feeding schedule.
4. Pruning
Wisteria needs regular pruning to keep it under control and promote more blooms.
- When to Prune:
- Winter or Early Spring: Prune during the dormant season (before new growth starts) to shape the plant and remove dead or damaged wood.
- After Blooming: In late summer or early fall, prune the vine back to encourage strong growth for the next blooming season.
- Pruning Steps:
- Cut back long shoots and side branches to about 6 inches long after flowering. This will help improve flowering the next year by focusing the plant’s energy on producing blooms rather than excessive vine growth.
- Remove any dead or overcrowded wood to maintain airflow and shape.
5. Training and Supporting
Wisteria needs strong support as it grows, especially since it can become quite heavy.
- Support Structure: Use a trellis, pergola, or arbor that’s sturdy enough to hold the plant. Wisteria can grow to 30 feet or more, so ensure your support is up to the task.
- Training: As it grows, tie the vine to the structure using soft twine or plant ties. Train it to grow in the direction you prefer, whether that’s a vertical, horizontal, or fan shape.
6. Managing Pests and Diseases
Wisteria is relatively pest-resistant but may occasionally face a few problems:
- Aphids: These pests can appear in early spring on new growth. They can be hosed off or treated with insecticidal soap.
- Scale Insects: Look for small, hard bumps on the stems and leaves. You can remove them manually or treat with horticultural oil.
- Fungal Issues: Wisteria can be prone to fungal diseases like powdery mildew or root rot, especially if overwatered. Ensure the plant has good drainage, and remove any infected foliage.
7. Winter Care
- Cold Tolerance: Wisteria is hardy in USDA zones 4-9, depending on the variety. In colder climates, you may need to protect young plants in winter with burlap or frost cloth.
- Mulching: Apply mulch around the base of the plant to insulate the roots during freezing temperatures.
- Pruning Before Winter: Make sure to prune the plant before winter to reduce the weight of snow and prevent damage to the structure.
8. Encouraging Blooms
- Patience: Wisteria can take 3-5 years to start flowering, especially if it was grown from seed. Grafted varieties typically bloom sooner.
- Sunlight: Ensure the plant gets enough sunlight (at least 6 hours a day) to promote healthy flowering.
- Avoid Over-Pruning: Wisteria flowers on old wood, so heavy pruning during the growing season can cut off potential flowers. Limit your pruning to after the flowering period.
Wisteria Common Problems:
- No Flowers: If your wisteria isn’t blooming, it could be because it’s not getting enough sun, you’re over-fertilizing (especially with nitrogen), or you’re pruning too much.
- Overgrowth: Wisteria can become very vigorous. Regular pruning and ensuring it has the proper support can help keep it manageable.
- Leggy Growth: If your plant is becoming leggy, it might not be getting enough sunlight, or it may need more frequent pruning.
By following these care tips and choosing the right wisteria variety, you can enjoy a healthy and blooming vine that adds beauty and fragrance to your garden for years to come!
Do you already have a wisteria vine, or are you planning to plant one soon? Let me know if you need more specific help!
Bougainvillea is a vibrant, fast-growing vine or shrub that adds a burst of color to any garden. Known for its papery bracts (often mistaken for flowers), bougainvillea blooms in bright shades of purple, pink, red, orange, and white. Caring for bougainvillea is relatively straightforward, but it does have a few specific needs to keep it flourishing. Here’s a guide to help you maintain healthy bougainvillea plants:
1. Planting Bougainvillea
- Location: Bougainvillea loves full sun and needs at least 5-6 hours of direct sunlight a day. The more sun it gets, the more it will bloom.
- Soil: It thrives in well-draining, slightly acidic to neutral soil (pH 5.5-6.5). Bougainvillea does not like “wet feet,” so avoid planting it in heavy, waterlogged soil.
- Spacing: Bougainvillea is a vigorous grower, so plant it where it has plenty of room to spread out or climb. Provide support like a trellis, wall, or arbor for climbing varieties.
2. Watering
- Young Plants: Water bougainvillea regularly in the first few weeks to help it establish roots. Keep the soil consistently moist but not soggy.
- Established Plants: Once established, bougainvillea is relatively drought-tolerant. Water it deeply but infrequently to encourage strong root growth. Allow the soil to dry out slightly between waterings.
- Overwatering: Be cautious of overwatering, as bougainvillea does not like wet soil. Make sure the plant is in well-draining soil to avoid root rot. If the leaves start to yellow or fall off, it could be a sign of overwatering.
- Mulching: Mulch around the base to conserve moisture, but keep mulch away from the plant’s stem to avoid rot.
3. Fertilizing
- Type of Fertilizer: Bougainvillea benefits from a balanced fertilizer or one with a higher phosphorus content (which encourages blooming). Use a fertilizer formulated for flowering plants or a balanced, slow-release fertilizer.
- When to Fertilize: Fertilize in early spring to encourage new growth and blooming. You can continue fertilizing once every month or so during the growing season (spring through summer), but avoid fertilizing in the winter when the plant is dormant.
- Too Much Fertilizer: Over-fertilizing, especially with nitrogen, can result in lush foliage but fewer flowers. Aim for a balanced fertilizer, and be careful not to overfeed.
4. Pruning Bougainvillea
- Why Prune: Pruning helps control the plant’s size, shape, and promotes new growth, which is essential for continuous blooming.
- When to Prune: Bougainvillea can be pruned in late winter or early spring, before new growth starts. You can also do light pruning during the growing season to shape the plant or remove dead or damaged branches.
- How to Prune:
- Cut back long, leggy stems to encourage bushier growth.
- Remove dead or diseased wood regularly.
- If you want to maintain a more compact shape or encourage more blooms, prune back the branches that have already flowered.
- Avoid Heavy Pruning: Avoid cutting too much back on bougainvillea during the blooming season, as this could reduce flowering. Focus on cutting back old or overgrown stems after blooming.
5. Training and Supporting
- Support for Climbing: Bougainvillea is a great climber, so provide a strong support system like a trellis, fence, or arbor to help it grow upward.
- Training: Tie the plant to your support using soft plant ties. Regularly check to ensure that it’s climbing in the direction you want.
- Compact Varieties: Some bougainvillea varieties are more compact and can be grown as shrubs or in containers.
6. Managing Pests and Diseases
Bougainvillea is relatively pest-resistant, but it can sometimes be affected by common garden pests.
- Aphids: These tiny pests may cluster on new growth, especially during the spring. You can remove them with a strong water spray or use insecticidal soap if necessary.
- Spider Mites: Bougainvillea is susceptible to spider mites, particularly in dry conditions. Regularly misting the leaves or using a gentle stream of water to wash them off can help.
- Bougainvillea Caterpillars: These caterpillars may feed on the leaves, causing some damage. Handpick or use an organic pesticide to manage them.
- Powdery Mildew: Bougainvillea is prone to fungal diseases like powdery mildew, especially in humid environments. Ensure good airflow around the plant, and avoid overhead watering to reduce the risk of fungal growth.
7. Winter Care
Bougainvillea is frost-sensitive and may not survive freezing temperatures, so it’s important to take care of it in colder climates.
- Cold Hardiness: Bougainvillea is hardy in USDA zones 9-11. In colder regions (zones 8 and below), bougainvillea needs protection during the winter.
- Winter Protection: If you’re in a region where temperatures dip below freezing, bring bougainvillea inside or cover it with frost cloths during cold spells. Alternatively, you can grow bougainvillea in a pot and bring it indoors during the winter months.
- Reduce Watering in Winter: In colder months, bougainvillea goes dormant and doesn’t require much water. Water sparingly to avoid root rot.
8. Encouraging Blooms
Bougainvillea is most well-known for its colorful, papery bracts, which surround the true flowers. Here’s how to encourage blooms:
- Sunlight: Bougainvillea needs plenty of sunlight to produce blooms. Ensure it’s planted in a sunny spot with at least 5-6 hours of direct sun.
- Fertilization: Regular fertilization with a low-nitrogen, high-phosphorus fertilizer will encourage more flowering.
- Watering: Allow the plant to dry out a bit between waterings. Bougainvillea blooms best when stressed slightly by underwatering, rather than overwatered.
- Pruning: Prune the plant after blooming to remove spent flowers and encourage more blooms for the next cycle.
9. Common Problems
- No Flowers: If your bougainvillea isn’t flowering, it could be a result of too much nitrogen fertilizer, inadequate sunlight, or overwatering. Try reducing fertilizer and making sure the plant is getting enough sun.
- Yellowing Leaves: This could be a sign of overwatering or nutrient deficiency (usually nitrogen). Adjust watering and consider using a balanced fertilizer.
- Weak Growth: Bougainvillea may become leggy if it doesn’t get enough sun or if it’s not pruned regularly. Prune back any long stems and make sure it’s in a sunny spot.
Summary Care Tips:
- Sunlight: Full sun (5-6 hours a day).
- Watering: Deeply but infrequently. Allow soil to dry between waterings.
- Fertilizing: Use a balanced or phosphorus-rich fertilizer, but avoid high-nitrogen formulas.
- Pruning: Regularly prune after blooms to encourage new growth.
- Winter Care: Protect from frost in cold climates; bring it indoors or cover it in freezing temperatures.
Bougainvillea is a spectacular plant that can thrive with minimal care if placed in the right conditions. It can provide a colorful focal point in your garden, whether as a vine climbing a structure or as a bush in a container. Are you growing bougainvillea already or considering adding it to your garden? Let me know if you need more specific advice!

Camellias are a stunning and versatile group of plants, often known for their beautiful flowers and glossy evergreen foliage. They bloom in a range of colors, including white, pink, red, and even yellow, depending on the variety. Below are some popular camellia varieties and tips on how to care for them.
Popular Camellia Varieties:
1. Camellia japonica (Japanese Camellia)
This species is the most well-known and widely grown for its large, showy flowers that bloom in late winter to early spring.
- ‘Debutante’: Soft pink, fragrant blooms, perfect for gardens and containers.
- ‘Lady Campbell’: Deep pink, elegant flowers that bloom in late winter.
- ‘Nuccio’s Gem’: White, large blooms with a light fragrance, perfect for formal gardens.
- ‘April Remembered’: Bright pink flowers, ideal for more temperate climates.
- ‘Shishi Gashira’: A compact camellia with vibrant red flowers, great for smaller gardens or containers.
2. Camellia sasanqua (Sasanqua Camellia)
Sasanqua camellias bloom earlier in the fall and are more tolerant of full sun compared to Camellia japonica. They often have smaller, fragrant flowers.
- ‘Yuletide’: One of the most popular varieties, it produces bright red flowers with yellow centers, blooming in late fall to early winter.
- ‘Shishi Gashira’: Another variety that works well for smaller spaces, producing deep red flowers.
- ‘Cleopatra’: White flowers with a pink blush, perfect for hedges or as a stand-alone plant.
- ‘Sparkling Burgundy’: Burgundy-red flowers with a striking appearance, great for year-round interest.
3. Camellia reticulata (Reticulated Camellia)
Reticulata camellias are known for their large, dramatic flowers and are commonly used in breeding new hybrid varieties.
- ‘Gogo’: Bold red, large blooms with a somewhat ruffled look.
- ‘Frank Houser’: Deep rose-pink flowers with large, dramatic blooms.
- ‘Donnie’: Pink flowers with a strong fragrance, perfect for larger landscapes.
4. Camellia x williamsii (Hybrid Camellia)
A hybrid of Camellia japonica and Camellia saluenensis, these varieties tend to have a good balance of showy flowers and hardy growth.
- ‘Taylor’s Perfection’: Light pink flowers with a ruffled edge that bloom in late winter to early spring.
- ‘Lavinia Maggi’: Large, pale pink flowers that are almost frilled, blooming in early spring.
- ‘Cleopatra’: Large white flowers with pink blushes, an elegant and classic choice.
5. Camellia sinensis (Tea Camellia)
This is the species from which tea is made, but it also produces small, white flowers.
- ‘Sinensis var. sinensis’: The traditional variety used for green tea production.
- ‘Sinensis var. assamica’: Known for its larger leaves, often grown in tea plantations.
Camellia Care Guide:
1. Sunlight and Location
- Light Requirements: Camellias thrive in partial shade, particularly in hot climates. In cooler regions, they can tolerate more direct sun. Avoid planting them in areas that get full, harsh afternoon sun, as this can scorch their leaves.
- Planting: Choose a location that has well-drained soil. Avoid spots where water may accumulate, as camellias do not like “wet feet.”
2. Soil
- Type: Camellias prefer acidic, well-draining soil (pH 5.5-6.5). Use compost or acidic mulch around the base to improve soil quality if needed.
- Drainage: Good drainage is crucial. Plant in raised beds or amend heavy clay soil to improve drainage and prevent root rot.
3. Watering
- Watering Schedule: Camellias like consistently moist soil, but it should never be soggy. Water them regularly during the growing season, especially during dry spells. After planting, water deeply and then let the top inch or two of soil dry out before watering again.
- Mulching: Apply a 2-3 inch layer of mulch around the base of the plant. This helps retain moisture, keeps the roots cool, and reduces weed growth. Keep the mulch away from the stem to avoid rot.
4. Fertilizing
- When to Fertilize: Fertilize camellias in early spring when new growth begins. Avoid fertilizing in the fall or winter as this can stimulate growth that might not survive winter.
- Type of Fertilizer: Use a slow-release fertilizer designed for acid-loving plants (such as one formulated for azaleas or rhododendrons). Avoid fertilizers high in nitrogen as this can encourage too much leafy growth at the expense of blooms.
5. Pruning
- Pruning Time: Prune camellias after they have finished blooming, typically in late winter or early spring. Avoid pruning in the fall, as this can remove potential flower buds for the next season.
- How to Prune: Focus on removing dead or diseased wood and shaping the plant. You can lightly prune to maintain the shape, but be careful not to cut too many flower buds.
- Thinning: If your camellia is becoming too dense, you can thin out some of the older stems to allow light and air to penetrate the center of the plant.
6. Winter Care
- Cold Hardiness: Camellias are hardy in USDA zones 7-10, but some varieties, like Camellia sasanqua, can tolerate cooler temperatures.
- Protection from Frost: If you live in an area where temperatures regularly dip below freezing, consider covering the plant with frost cloth or burlap during cold snaps, or bring potted camellias indoors for winter.
- Mulching for Winter: A thick layer of mulch around the roots will help insulate the plant and prevent the roots from freezing.
7. Pests and Diseases
- Common Pests: Camellias are generally pest-resistant, but you may encounter aphids, scale insects, or spider mites, particularly during warmer months. Treat infestations with insecticidal soap or neem oil.
- Diseases: Camellias can be prone to fungal diseases like petal blight or leaf spot. To prevent these, ensure good air circulation around the plant and remove any infected plant material promptly. Regularly inspect your camellias for signs of disease or pest damage.
8. Encouraging Blooms
- Blooming Time: Camellias generally bloom from late winter to early spring. However, the exact timing will depend on the variety. Sasanqua varieties tend to bloom earlier (fall to early winter), while Japonicas bloom later (winter to early spring).
- Flowering Problems: If your camellia isn’t blooming, it could be due to insufficient sunlight, over-fertilization (especially with nitrogen), or a late frost that damages the buds. Be patient, as some camellias take several years to establish before blooming fully.
Common Problems
- No Flowers: Can be caused by too much nitrogen fertilizer (which encourages foliage instead of flowers), too much shade, or damaged buds from late frosts. Ensure the plant is in the right location and prune it properly.
- Yellowing Leaves: Yellowing leaves can indicate a nutrient deficiency, poor drainage, or overwatering. Check soil drainage and fertilize with an acidic plant fertilizer.
- Fungal Diseases: Camellias can sometimes be affected by leaf spot or petal blight. Remove infected leaves and avoid overhead watering to reduce fungal spread.
Summary Care Tips:
- Sunlight: Partial shade is ideal; avoid intense afternoon sun.
- Watering: Keep soil consistently moist but not waterlogged.
- Soil: Slightly acidic, well-drained soil is essential.
- Pruning: After blooming, prune to shape the plant and remove dead wood.
- Fertilizing: Feed with an acid-loving fertilizer in early spring.
- Winter Care: Protect from frost, especially in colder zones.
With these care tips, you’ll be able to enjoy the elegant blooms and evergreen foliage of your camellia plant for years to come. Are you looking to add a camellia to your garden, or do you already have one that you need help with? Let me know if you’d like specific advice!
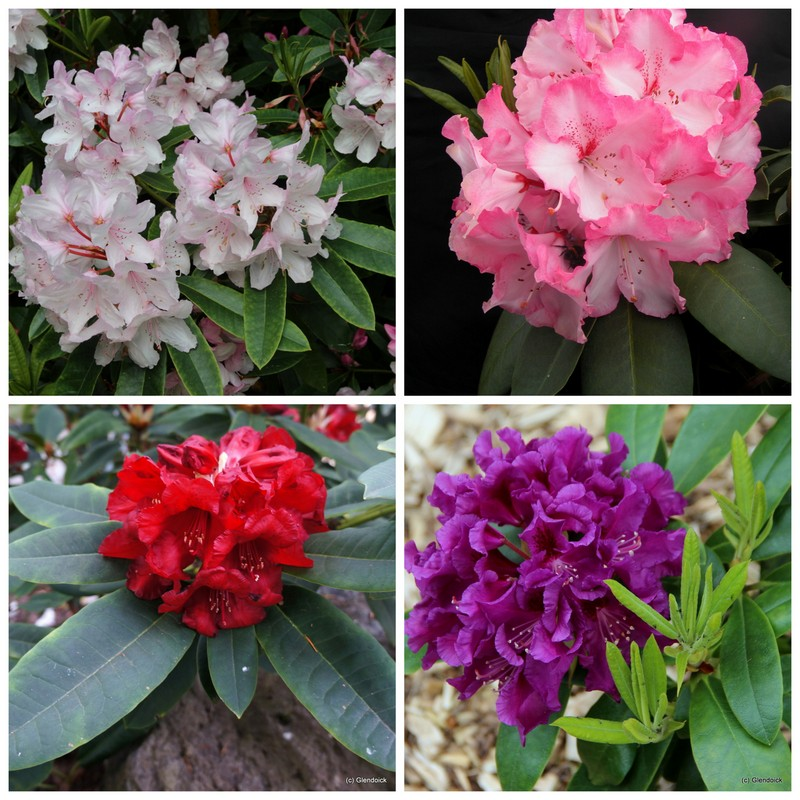
Rhododendrons are a beautiful and diverse group of plants, with many varieties and cultivars. They thrive in cool, moist environments and are prized for their stunning blooms. Here are some common types of rhododendrons and care tips for them:
Common Rhododendron Varieties:
- Rhododendron ‘PJM’ – Known for its purple-pink flowers and compact size, it’s a popular choice for smaller gardens.
- Rhododendron ‘Cunningham’s White’ – A classic white-flowered variety that’s hardy and relatively low-maintenance.
- Rhododendron ‘Nova Zembla’ – Features deep red flowers and is a more robust variety.
- Rhododendron ‘Purple Splendor’ – Produces large purple blooms and is often a standout in gardens.
- Rhododendron ‘Boursault’ – A variety with striking purple-red flowers.
Care Tips:
- Soil: Rhododendrons prefer acidic, well-drained, and rich, loamy soil. If your soil is too alkaline, consider amending it with compost or a soil acidifier.
- Sunlight: These plants generally do best in partial shade. Too much direct sunlight can scorch their leaves, but too little light can lead to poor flowering.
- Watering: Rhododendrons like consistently moist soil, but not soggy. Water them deeply and evenly, especially in the growing season. Ensure the soil is well-drained to prevent root rot.
- Mulching: Mulch around the base of the plant with organic material (e.g., pine bark, wood chips) to help retain moisture and keep the roots cool.
- Fertilizing: Feed them with an acidic fertilizer in spring after flowering. Avoid using fertilizers with high phosphorus, as rhododendrons are sensitive to that nutrient.
- Pruning: Lightly prune dead or damaged wood in the spring after blooming, or shape the plant as desired. Avoid heavy pruning, as it can affect future blooming.
- Winter Care: In cold regions, some varieties may need winter protection. You can shield the plant with burlap or evergreen boughs if frost damage is a concern.
Rhododendrons are relatively low-maintenance once established, but attention to these factors can help them flourish year after year. Do you have a specific type of rhododendron in mind for your garden?

Azaleas are a subset of the Rhododendron family, and they’re known for their vibrant, showy flowers and compact size. Azaleas come in both deciduous and evergreen varieties, and their care needs are similar to those of rhododendrons, but there are a few key differences depending on the type.
Popular Azalea Varieties:
- Rhododendron (Azalea) ‘Encore’ Series – Known for re-blooming throughout the growing season, they produce colorful blooms in spring and again in late summer or fall.
- Azalea ‘Gable’ Series – Hardy, compact, and generally produces large, colorful blooms in various shades.
- Azalea ‘George Tabor’ – A classic Southern favorite with light pink flowers.
- Azalea ‘Homebush’ – A beautiful red-flowered azalea variety.
- Azalea ‘Pink Ruffle’ – Features soft pink ruffled flowers and a compact growth habit.
- Azalea ‘Howard’s Red’ – Known for striking red flowers and its ability to bloom in shaded conditions.
Azalea Care Tips:
1. Light Requirements:
- Azaleas generally prefer partial shade to full shade, though some varieties can tolerate more sunlight, especially those that are hardier.
- Morning sun and afternoon shade are often ideal to prevent leaf scorch and promote healthy growth.
2. Soil:
- Like rhododendrons, azaleas require acidic soil (pH 4.5 to 6.0).
- The soil should be well-drained, yet able to retain moisture. Sandy or loamy soil is best. If your soil is too alkaline, amend it with organic compost or use a soil acidifier to lower the pH.
- Good drainage is key, so avoid planting in areas where water pools.
3. Watering:
- Azaleas prefer consistent moisture. They like the soil to stay moist but not waterlogged. Water them deeply to encourage deep root growth, especially during dry spells.
- Water at the base of the plant to prevent wetting the leaves, which can lead to fungal diseases.
4. Fertilizing:
- Fertilize in early spring just before new growth begins, using a fertilizer designed for acid-loving plants. A slow-release fertilizer will help provide nutrients throughout the growing season.
- Avoid over-fertilizing, as this can result in lush foliage growth at the expense of flowers.
5. Pruning:
- Deadheading (removing spent flowers) is important for maintaining the appearance of the plant and can also encourage new growth.
- For evergreen azaleas, light pruning can be done right after blooming to shape the plant or remove any dead or damaged wood.
- If you need to prune larger branches or reshape the plant, do so in early spring, just after the blooming period, to avoid cutting off next year’s flowers.
- For deciduous azaleas, prune after blooming to maintain shape and remove any leggy or unwanted growth.
6. Mulching:
- Apply 2-4 inches of mulch around the base of the plant to help retain moisture, keep the roots cool, and prevent weeds.
- Use organic mulch, like pine bark or wood chips, which also help acidify the soil over time.
7. Winter Care:
- Evergreen azaleas may require some protection from harsh winter conditions, especially in areas with cold winters.
- Use burlap screens or evergreen boughs to shield the plants from windburn and freezing temperatures.
- If you live in a cold region, consider planting azaleas in a location that is sheltered from winter winds.
8. Pests and Diseases:
- Azaleas are generally pest-resistant but can sometimes suffer from aphids, leaf spot, or root rot if planted in poorly-drained soil.
- Watch for yellowing leaves or black spots, which could indicate fungal infections. Treat with fungicides as needed.
- Regularly inspect for scale insects or spider mites and use insecticidal soap if necessary.
Special Considerations:
- Evergreen Azaleas retain their leaves year-round, so they need more consistent care through the winter months.
- Deciduous Azaleas will lose their leaves in the fall but are typically more resilient to extreme cold temperatures.
Conclusion:
Azaleas are relatively easy to care for as long as their soil, water, and light needs are met. They make a great addition to gardens with their beautiful blooms, especially in shaded or woodland areas. Just be mindful of the variety you choose and its specific requirements.
Cherry trees are popular for their stunning blossoms in spring, as well as their fruit in the summer. There are two main types of cherry trees: ornamental cherries (grown primarily for their beauty) and fruiting cherries (grown for their edible fruit). Here are some common varieties of both types:
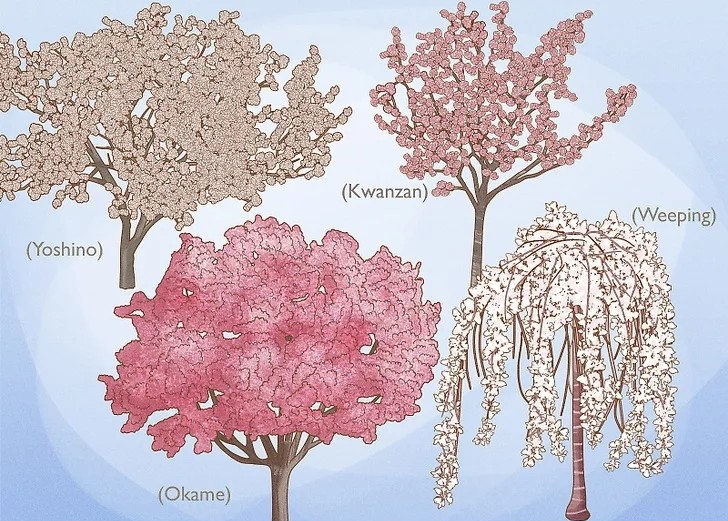
Ornamental Cherry Trees:
These trees are primarily grown for their beautiful, showy flowers, often in shades of pink, white, or red.
- Prunus ‘Yoshino’ (Yoshino Cherry) – Famous for its striking display of pale pink to white flowers, commonly seen in cherry blossom festivals.
- Prunus ‘Kwanzan’ (Kwanzan Cherry) – Known for its deep pink, double flowers and vigorous growth. It’s a popular ornamental tree.
- Prunus ‘Okame’ (Okame Cherry) – Features vibrant pink flowers that bloom early in the spring and a smaller, compact growth habit.
- Prunus ‘Shirotae’ (Mount Fuji Cherry) – This variety has large, white blossoms and a spreading form, resembling the famous Japanese cherry trees.
- Prunus serrulata ‘Amanogawa’ (Amanogawa Cherry) – A columnar, narrow tree with soft pink flowers, ideal for smaller gardens or spaces.
Fruiting Cherry Trees:
These varieties are grown for their delicious, edible cherries and can be sweet or tart. They are often used in pies, jams, and fresh eating.
Sweet Cherries (Prunus avium):
- ‘Bing’ – One of the most popular sweet cherry varieties, with dark red to purple-black fruit. It’s a late-season cherry that is sweet and firm.
- ‘Rainier’ – Known for its yellow fruit with a red blush, Rainier cherries are very sweet and prized for fresh eating.
- ‘Lapins’ – A self-pollinating variety with large, sweet cherries similar to Bing but with a slightly earlier harvest.
- ‘Stella’ – A self-fertile variety, producing large, dark red sweet cherries. It’s a great option for those with limited space.
Tart Cherries (Prunus cerasus):
- ‘Montmorency’ – The most popular tart cherry variety in the U.S., commonly used for pies, preserves, and other baked goods. It’s known for its bright red color and tart flavor.
- ‘North Star’ – A dwarf variety that produces small, tart cherries perfect for pies and baking. It’s often grown in smaller spaces or containers.
- ‘Balaton’ – A Hungarian variety known for its deep red, tart cherries, ideal for cooking, juicing, or making jams.
- ‘Meteor’ – A smaller, cold-hardy variety that produces tart cherries, often used in cooking or as a snack.
Care Tips for Cherry Trees:
Whether you’re growing an ornamental or fruiting cherry, here are some essential care tips to help your tree thrive:
- Sunlight: Cherry trees need full sun (at least 6-8 hours a day) to produce the best flowers or fruit.
- Soil: They prefer well-drained soil with a slightly acidic to neutral pH. If your soil is heavy or clay-like, amend it with compost or organic matter.
- Watering: Water deeply, especially in dry periods. However, avoid over-watering as cherries don’t like soggy soil.
- Pruning: Regular pruning helps maintain a healthy shape, improves air circulation, and encourages more fruit. Prune after the tree has finished flowering (for ornamental varieties) or after harvest (for fruiting cherries).
- Fertilizing: Fertilize with a balanced fertilizer in early spring when new growth begins. Avoid over-fertilizing, as this can lead to excess foliage growth rather than flowering or fruiting.

Crepe myrtle (Lagerstroemia) is beloved for its vibrant flowers, smooth bark, and ornamental appeal, and there are several types and cultivars you can choose from. Here’s an overview of its names and care:
Common Names:
- Crepe Myrtle
- Crape Myrtle
- Lagerstroemia (Scientific Name)
Popular Varieties/Cultivars:
- Lagerstroemia indica (Common Crepe Myrtle)
- Native to Asia, this is the most commonly grown species and features colorful blooms in shades of pink, purple, red, and white.
- Lagerstroemia fauriei
- A species native to Japan, this variety is known for its white flowers and attractive bark. It’s often used in hybridization for better disease resistance.
- Lagerstroemia ‘Natchez’
- White flowers and smooth, exfoliating bark make this cultivar a favorite in gardens.
- Lagerstroemia ‘Muskogee’
- This cultivar features lavender-colored flowers and is known for its heat tolerance and disease resistance.
- Lagerstroemia ‘Dynamite’
- A stunning variety with deep red flowers, perfect for adding a bold splash of color.
- Lagerstroemia ‘Tonto’
- A smaller variety with vibrant red flowers and compact growth, ideal for smaller spaces.
- Lagerstroemia ‘Tuscarora’
- Known for its coral-pink flowers and strong resistance to powdery mildew.
Care Tips for Crepe Myrtle:
- Sunlight:
- Crepe myrtles thrive in full sun, needing at least 6 hours of direct sunlight daily for the best blooms.
- Soil:
- They prefer well-draining soil that is slightly acidic but can tolerate a wide variety of soil types, including clay.
- Watering:
- Water regularly, especially in the first few years as they establish roots. However, once mature, they are drought-tolerant. Overwatering can cause root rot, so make sure the soil is well-drained.
- Fertilizing:
- Apply a balanced fertilizer in early spring to encourage healthy growth and blooms. Be cautious not to over-fertilize, especially with nitrogen, as it can lead to lush foliage without many flowers.
- Pruning:
- Prune in late winter or early spring before new growth begins. Light pruning helps maintain the natural shape and removes any dead or damaged wood. Avoid drastic pruning (“crepe murder”), which can damage the plant and reduce flowering.
- Pests and Diseases:
- Crepe myrtles are generally pest-resistant but can sometimes face issues with aphids, powdery mildew, or fungal diseases. Ensure good air circulation and inspect regularly.
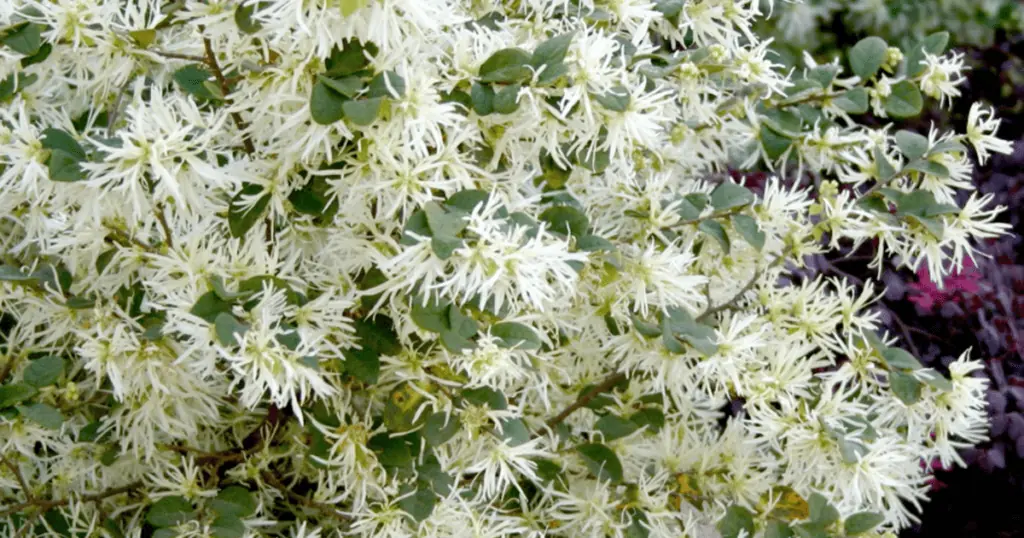
Loropetalum, often known as Chinese Fringe Flower, is a beautiful evergreen shrub that comes in several varieties. It is admired for its striking, colorful foliage and unique fringe-like flowers. Here are some common names and varieties, as well as care tips for growing them:
Common Names:
- Chinese Fringe Flower
- Loropetalum
Popular Varieties:
- Loropetalum chinense (Chinese Fringe Flower) – This is the most common species, offering the classic pink to purple fringe flowers and dark purple foliage.
- Loropetalum chinense var. rubrum (Ruby Loropetalum) – Known for its deep, dark purple foliage and vibrant pink to red flowers.
- Loropetalum ‘Plum Gorgeous’ – A popular cultivar with rich purple foliage and pink flowers.
- Loropetalum ‘Ever Red’ – Features reddish-purple leaves and bright pink blooms.
- Loropetalum ‘Shang-Hi’ – A more compact variety with slightly smaller leaves and deep burgundy color.
Care Tips:
- Light: Loropetalum prefers full sun but can tolerate partial shade. In shadier conditions, the plant might not bloom as profusely, but it can still thrive.
- Soil: Well-draining, acidic soil is ideal for loropetalum. It can tolerate slightly alkaline conditions but thrives best in slightly acidic to neutral pH soil.
- Watering: Keep the soil consistently moist, especially during the plant’s establishment phase. Once established, it’s somewhat drought-tolerant but still benefits from regular watering, particularly during dry spells.
- Temperature: Loropetalum does best in USDA hardiness zones 7-10. It can handle some cold but may suffer from frost damage if exposed to extreme cold.
- Fertilization: Fertilize in early spring with a slow-release, balanced fertilizer to support growth and flowering. Avoid over-fertilizing, as it can result in more foliage growth than blooms.
- Pruning: Light pruning after the blooming period can help shape the plant and encourage bushier growth. Remove any dead or damaged branches as needed.
- Mulching: Applying mulch around the base of the plant helps retain moisture, suppress weeds, and insulate the roots, especially during colder months.
Pests and Diseases:
Loropetalum is generally pest-resistant but can sometimes be affected by spider mites, aphids, or scale insects. Watch out for signs of fungal diseases, especially in humid climates. Regularly inspect for pests and treat them as necessary.
With proper care, loropetalum can be a vibrant and low-maintenance addition to your garden or landscape!
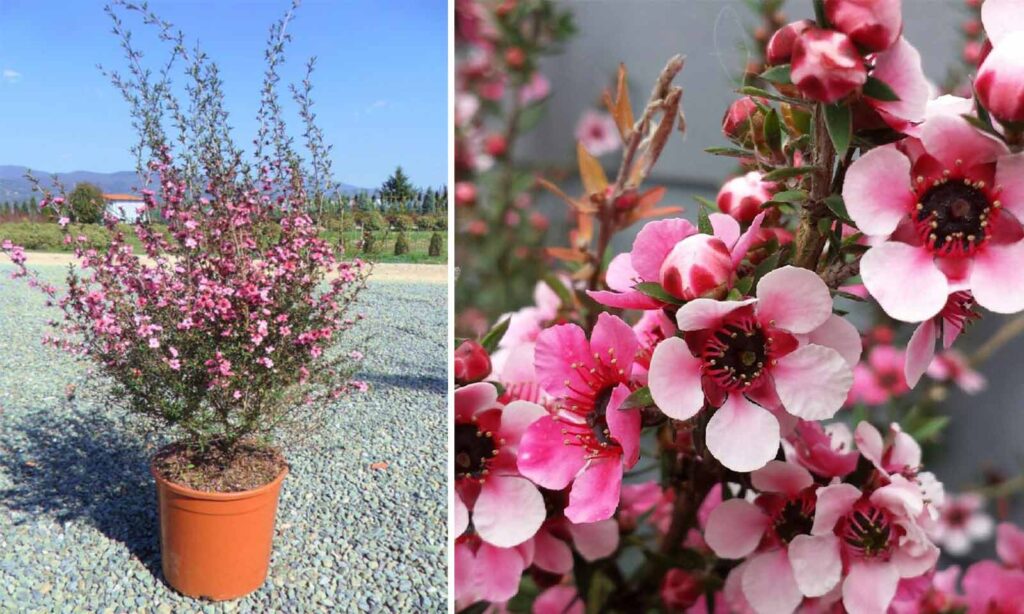
Leptospermum, commonly known as Tea Tree, is a genus of shrubs or small trees in the Myrtaceae family, native to Australia and some parts of New Zealand. The name “Tea Tree” comes from early settlers who used the leaves to make a tea, though it’s more commonly associated with the Australian Melaleuca species today. Leptospermum is known for its beautiful, showy flowers and aromatic foliage.
Common Names:
- Tea Tree
- Manuka (specific species like Leptospermum scoparium)
- New Zealand Tea Tree
- Australian Tea Tree
Popular Varieties:
- Leptospermum scoparium (Manuka or New Zealand Tea Tree) – Known for its small, aromatic leaves and beautiful, pink to white flowers. It’s also the plant from which Manuka honey is made, which is famous for its health benefits.
- Leptospermum laevigatum (Coastal Tea Tree) – This variety is commonly found along Australia’s coastline and is known for its white flowers and strong, aromatic foliage.
- Leptospermum polygalifolium (Purple Tea Tree) – A variety that features lovely purple flowers, often blooming in the summer and early autumn months.
- Leptospermum “Copper Glow” – A hybrid cultivar that has reddish-brown foliage and deep pink to red flowers. It is compact and commonly used in garden beds or containers.
- Leptospermum “Pink Cascade” – Known for its cascading growth habit and vibrant pink flowers, this variety is a popular choice for hanging baskets or ground cover.
Care Tips:
- Light: Leptospermum prefers full sun to light partial shade. It thrives in bright, sunny locations where it can get at least 6 hours of sunlight a day. In areas with hot summers, some afternoon shade can help prevent leaf scorch.
- Soil: This plant prefers well-drained, acidic to neutral soils. It doesn’t like soggy conditions, so it’s important that the soil drains well. Sandy or loamy soils are ideal. For containers, a well-draining potting mix is a must.
- Watering: Leptospermum is fairly drought-tolerant once established but needs regular watering during the growing season. Ensure the soil is kept moderately moist, especially during its first year. However, avoid over-watering or letting the plant sit in waterlogged soil as this can lead to root rot.
- Temperature: Leptospermum grows best in temperate climates (USDA Zones 8-11). It is frost-sensitive, so protect it from freezing temperatures if you live in a colder region. In particularly cold areas, it’s best grown in containers that can be moved indoors or to a sheltered location in winter.
- Fertilization: Leptospermum generally doesn’t require heavy fertilization. A light application of slow-release fertilizer in spring can help encourage growth. Avoid using high-phosphorus fertilizers, as they can harm the plant. Over-fertilization can result in excessive foliage growth at the expense of flowers.
- Pruning: Leptospermum responds well to light pruning to maintain its shape and encourage dense growth. Prune after flowering to remove spent blooms and any dead or damaged wood. If you want to control its size, prune it back moderately, but avoid cutting into old wood, as this can affect blooming.
- Mulching: Mulch around the base of the plant to help retain moisture, suppress weeds, and maintain a stable root temperature. Avoid mulching directly against the stem of the plant.
Pests and Diseases:
- Pests: Leptospermum is fairly pest-resistant but may occasionally attract aphids, scale, or mealybugs. Regularly inspect the plant for signs of pests and treat with insecticidal soap or neem oil if necessary.
- Diseases: The main concern is root rot due to over-watering or poorly-draining soil. Fungal issues can also occur in humid climates, so ensure good air circulation around the plant.
Additional Tips:
- Attracts Pollinators: Leptospermum flowers are great for attracting bees and other pollinators. It’s a good choice if you’re trying to support local wildlife in your garden.
- Manuka Honey: Some varieties, particularly Leptospermum scoparium, are famous for their honey, known as Manuka honey. It’s prized for its antibacterial properties and has become a popular health product.
- Growth Habit: While many Leptospermum species are naturally shrubby, some can be trained into small trees with proper pruning. It’s also well-suited for coastal gardens due to its salt tolerance.
Summary:
Leptospermum is a beautiful, hardy plant that requires little maintenance once established. With its stunning flowers and aromatic leaves, it makes a great addition to gardens, especially in regions with temperate climates. It thrives with plenty of sun, well-draining soil, and moderate watering. Whether used in borders, containers, or as a hedge, Leptospermum can bring vibrant color and texture to your landscape.
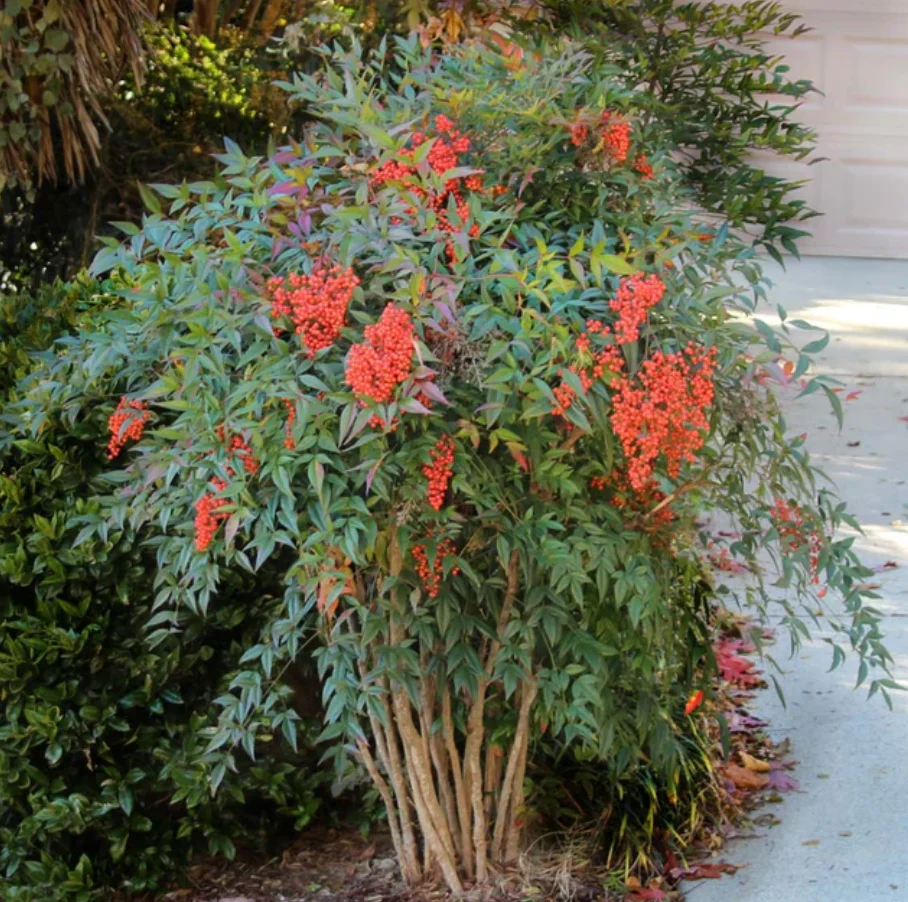
Nandina, commonly known as Heavenly Bamboo, is a popular evergreen shrub with ornamental appeal. It is known for its colorful foliage, particularly in the fall and winter, and its attractive red berries. Nandina is very adaptable and can be used in various landscape settings, including hedges, borders, and containers.
Common Names:
- Heavenly Bamboo
- Sacred Bamboo
- Nandina
Popular Varieties:
- Nandina domestica (Common Nandina): The most commonly grown variety, known for its lacy, feathery leaves and red berries. It has a compact, upright growth habit, typically growing 3 to 8 feet tall.
- Nandina ‘Firepower’: A compact variety that offers vibrant red and purple foliage, especially in cooler months. This one is often used as a smaller ornamental shrub or in containers.
- Nandina ‘Gulf Stream’: A dwarf variety with glossy green leaves and a more rounded shape. It also takes on reddish hues in the fall and winter.
- Nandina ‘Moon Bay’: A variety with lighter green foliage and red stems that adds contrast and texture to gardens. It’s a bit more compact, making it great for smaller spaces.
- Nandina ‘Harbour Dwarf’: Another dwarf variety, this one is more bushy with deep green foliage and a compact growth habit, making it perfect for small gardens or ground cover.
Care Tips:
- Light: Nandina does well in full sun to partial shade. In full sun, the foliage can take on more vibrant colors, especially in cooler months. It can tolerate some shade but may not produce as many berries or show as much color.
- Soil: Nandina is adaptable to a wide range of soils but prefers well-drained, slightly acidic to neutral soil. It’s relatively low-maintenance in terms of soil requirements, as long as it doesn’t sit in waterlogged conditions.
- Watering: Water Nandina regularly, especially during its first year of establishment. Once established, it is drought-tolerant and can withstand short periods of dry conditions. However, during extended dry spells, deep watering helps promote better growth and berry production.
- Temperature: Nandina is hardy in USDA zones 6-9, which means it does well in temperate climates. While it can tolerate light frost, extreme cold or harsh winters may damage the plant’s foliage. In colder regions, consider using mulch or protecting it with burlap during the winter months.
- Fertilization: Nandina doesn’t require heavy feeding. A light application of slow-release fertilizer in the spring can help support new growth. Avoid excessive fertilization, as it can encourage overly lush growth at the expense of flowers and berries.
- Pruning: Light pruning is recommended to maintain the shape and size of the plant. You can remove any dead or damaged branches, and trim the plant back to shape after flowering. In some cases, cutting back older stems can encourage new growth at the base.
- Mulching: Mulch around the base of the plant to help retain moisture, suppress weeds, and insulate the roots, especially during the winter months. Just avoid piling mulch up against the plant’s trunk.
Pests and Diseases:
- Pests: Nandina is generally pest-resistant but can sometimes attract aphids or scale insects. These can be controlled with insecticidal soap if necessary.
- Diseases: It is relatively disease-resistant, though it may occasionally suffer from root rot if planted in poorly-draining soil. Ensure good drainage to avoid waterlogging, which can cause root rot.
Additional Tips:
- Berries: The red berries that appear in the fall are a signature feature of Nandina. While they are decorative, they can also attract birds, making it a good plant for wildlife gardens. However, in some areas, Nandina’s berries can be toxic to pets, especially if consumed in large quantities.
- Foliage Color: Nandina is most beloved for its colorful foliage, which changes with the seasons. In spring and summer, it has a lush green appearance, but in the fall and winter, the leaves turn vibrant shades of red, orange, and purple, making it a striking focal point in the landscape.
- Invasive Potential: In some areas, Nandina can be considered invasive due to its ability to spread through seed dispersal. Be sure to check with your local garden center or extension service to see if it’s recommended for your area. Some cultivars like ‘Firepower’ or ‘Gulf Stream’ are more contained and don’t spread as aggressively.
Summary:
Nandina is a beautiful and versatile shrub that offers year-round interest with its attractive foliage and berries. It’s easy to care for, tolerating a range of light and soil conditions and requiring minimal maintenance. Whether used in a border, as a hedge, or in containers, Nandina can be a standout feature in your landscape. Just keep in mind its invasive potential in certain regions and its sensitivity to extreme cold, and you’ll be rewarded with a hardy and vibrant addition to your garden!
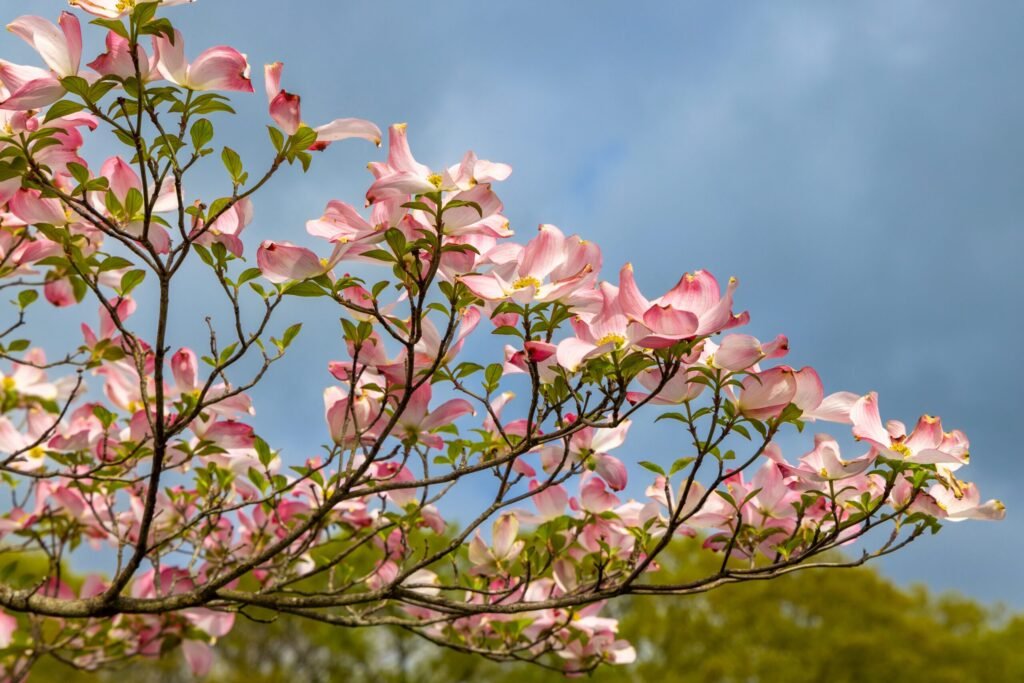
Dogwoods are popular trees known for their beautiful flowers, attractive foliage, and distinctive bark. There are several types of dogwoods, each with its own characteristics and care requirements. Below is a breakdown of some common dogwood species and tips for their care:
Common Types of Dogwoods:
- Flowering Dogwood (Cornus florida)
- Appearance: Known for its four-petaled white or pink flowers, this dogwood has a distinctive branching pattern and red fruits in the fall. It has broad, oval leaves that turn red or purple in autumn.
- Growing Zone: USDA Hardiness Zones 5-9
- Care:
- Prefers partial shade to full sun.
- Thrives in well-drained, slightly acidic soil.
- Needs regular watering, especially in dry periods.
- Prune after flowering to maintain shape and remove any dead or damaged wood.
- Watch for pests like dogwood borers and diseases like powdery mildew.
- Kousa Dogwood (Cornus kousa)
- Appearance: This variety blooms later in spring with showy white or pink bracts, which are often mistaken for flowers. It has dark green leaves that turn red or purple in the fall, and its fruit is a small, raspberry-like structure.
- Growing Zone: USDA Hardiness Zones 5-8
- Care:
- Prefers full sun to partial shade.
- Grows best in well-drained, acidic to neutral soil.
- Tolerates drier soil conditions better than the Flowering Dogwood.
- Prune after the flowers fade to maintain its shape.
- It is more resistant to diseases than the Flowering Dogwood.
- Pacific Dogwood (Cornus nuttallii)
- Appearance: Native to the west coast of North America, this species has large white flowers, and the leaves turn bright yellow in the fall.
- Growing Zone: USDA Hardiness Zones 7-9
- Care:
- Prefers partial shade and moist, well-drained soils.
- Requires regular watering, especially in hot weather.
- Like other dogwoods, it’s sensitive to root disturbance, so avoid excessive soil compaction.
- Prune after flowering to avoid cutting back flower buds.
- Japanese Dogwood (Cornus florida var. rubra)
- Appearance: A variety of the Flowering Dogwood, this species has pink or red blooms and is prized for its attractive blossoms in spring.
- Growing Zone: USDA Hardiness Zones 5-8
- Care:
- Prefers partial shade and well-drained, moist soil.
- Regular watering during dry periods is important.
- Prune in late winter or early spring before new growth begins.
- Bentham’s Dogwood (Cornus benthamii)
- Appearance: This species is often found as a shrub, with white flowers in early spring. It has lance-shaped leaves.
- Growing Zone: USDA Hardiness Zones 7-9
- Care:
- Prefers full sun or partial shade.
- Needs well-drained, moist soil.
- Regular pruning is important to maintain shape and promote healthy growth.
General Care Tips for Dogwoods:
- Watering: Dogwoods need consistent moisture, especially during hot, dry spells. Ensure the soil is moist but not waterlogged.
- Soil: Dogwoods thrive in rich, well-draining soil. Add organic matter like compost if your soil is poor or clay-heavy.
- Fertilizing: Fertilize in early spring with a balanced, slow-release fertilizer. Avoid over-fertilizing, as this can harm the tree.
- Pruning: Light pruning is generally recommended to remove dead or damaged wood. Heavy pruning should be avoided, especially for flowering dogwoods, as it can reduce flower production.
- Pests and Diseases: Watch for common pests like aphids, dogwood borers, and scale insects. Diseases such as dogwood anthracnose, powdery mildew, and cankers can affect dogwoods. To minimize these, ensure good air circulation, avoid overhead watering, and remove any infected branches.
- Mulching: Apply a layer of mulch around the base of the tree to help retain moisture and protect the roots from extreme temperatures.
By choosing the right species for your climate and following these care tips, you can enjoy the beauty of dogwoods year after year!
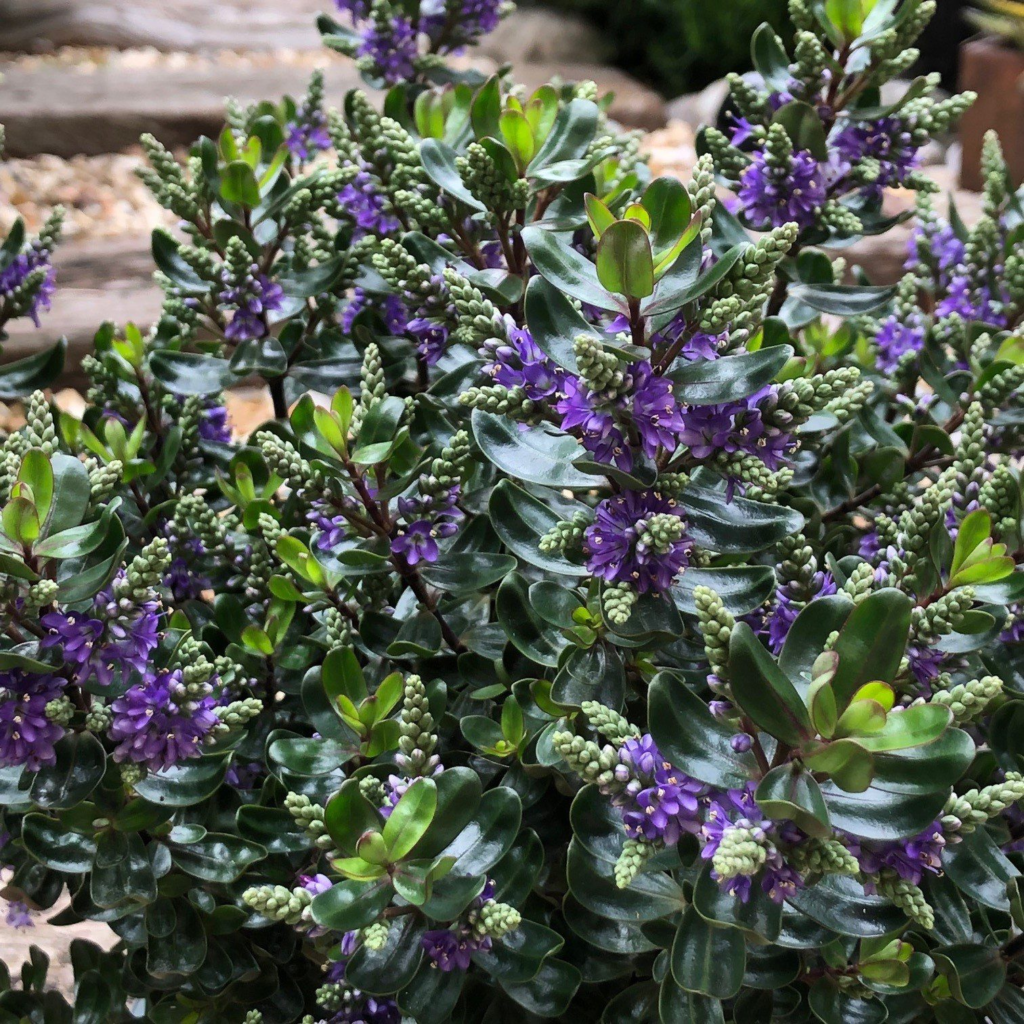
Hebes, also known as Hebe or veronica (though not the same as the true Veronica genus), are a group of shrubs native to New Zealand, Australia, and parts of South America. They are valued for their attractive foliage, vibrant flowers, and easy maintenance. Hebes are often grown as ornamental shrubs in gardens, providing year-round interest. Here’s a breakdown of some popular types of Hebes and their care requirements:
Popular Hebe Species:
- Hebe x franciscana (Francis’ Hebe)
- Appearance: A compact shrub with narrow, dark green leaves and small, lavender or pink flowers in late spring and summer. It has a rounded, bushy growth habit.
- Growing Zone: USDA Hardiness Zones 7-9
- Care:
- Prefers well-drained, moderately fertile soil.
- Tolerates full sun to partial shade.
- Water regularly, especially in dry periods, but avoid waterlogging.
- Prune lightly after flowering to maintain shape and remove dead or damaged branches.
- Can tolerate light frost but may not fare well in areas with severe winters.
- Hebe ‘Autumn Glory’
- Appearance: This cultivar is known for its stunning bronze-purple leaves in the autumn, complemented by purple-pink flowers in summer.
- Growing Zone: USDA Hardiness Zones 7-9
- Care:
- Thrives in full sun to partial shade.
- Prefers well-drained, slightly acidic soil.
- Regular watering is essential, but it dislikes soggy roots.
- Prune after flowering to shape and control size.
- Protect from harsh winter conditions, as it is sensitive to severe cold.
- Hebe ‘Snowstorm’
- Appearance: A low-growing shrub with green foliage and abundant white flowers in summer. It’s perfect for borders and rock gardens.
- Growing Zone: USDA Hardiness Zones 7-9
- Care:
- Prefers full sun to partial shade.
- Needs well-drained soil, and is tolerant of dry conditions once established.
- Water regularly in dry periods.
- Prune after flowering to maintain compact shape.
- Tolerates some frost but should be protected in colder climates.
- Hebe ‘Red Edge’
- Appearance: This variety has attractive variegated leaves with a red edge and clusters of white or pink flowers. It’s a smaller, compact variety.
- Growing Zone: USDA Hardiness Zones 7-9
- Care:
- Thrives in full sun to partial shade.
- Prefers well-drained, fertile soil.
- Regular watering is necessary but ensure good drainage.
- Prune lightly after flowering to maintain its shape and prevent legginess.
- It can tolerate light frost but should be protected during harsher winters.
- Hebe ‘Pascal’
- Appearance: This cultivar has soft green leaves with small white or pale lavender flowers in mid- to late summer.
- Growing Zone: USDA Hardiness Zones 7-9
- Care:
- Prefers full sun to partial shade.
- Grows well in well-drained, moderately fertile soil.
- Water regularly, especially in warmer weather.
- Prune after flowering to remove spent flowers and keep the plant tidy.
- Light frost tolerance, but it may need protection in colder climates.
- Hebe ‘Midsummer Beauty’
- Appearance: This variety is known for its glossy, dark green leaves and profuse, lilac-colored flowers that bloom in summer.
- Growing Zone: USDA Hardiness Zones 7-9
- Care:
- Prefers full sun to partial shade.
- Tolerates a wide range of soils but prefers well-drained, fertile soil.
- Water regularly, especially in dry conditions.
- Prune lightly after flowering to maintain its compact shape.
- May require protection from frost in colder climates.
General Care Tips for Hebe:
- Sunlight: Most Hebes prefer full sun, which promotes the best flower production and foliage color. However, they can tolerate partial shade, especially in hotter climates.
- Soil: Hebes prefer well-drained, slightly acidic to neutral soil. Heavy, waterlogged soils can cause root rot, so it’s important to ensure the soil is well-drained. If your soil is heavy, amend it with sand or organic matter to improve drainage.
- Watering: Hebes are relatively drought-tolerant once established but require regular watering, particularly during dry periods. Ensure the soil is kept consistently moist, but not soggy, as overwatering can lead to root rot.
- Fertilizing: While Hebes don’t require heavy feeding, you can apply a balanced, slow-release fertilizer in spring to encourage healthy growth and flowering. Avoid over-fertilizing, as this can encourage excessive foliage growth at the expense of flowers.
- Pruning: Hebes benefit from light pruning after flowering to encourage a tidy appearance and prevent them from becoming leggy. Cut back dead or damaged stems and spent flowers. Hard pruning may be done in early spring if needed to shape the plant, but avoid cutting too much, as it could reduce flower production.
- Winter Care: Hebes are relatively frost-hardy but may not tolerate severe winters, especially if they are not well-established. In colder climates, protect the plants by covering them with frost cloth or moving them to a sheltered spot.
- Pests and Diseases: Hebes are generally resistant to most pests, but they can be susceptible to aphids, mealybugs, and spider mites. Fungal diseases like powdery mildew can also occur in damp, humid conditions. Ensure good air circulation around the plant and avoid overhead watering to prevent disease.
- Mulching: Apply a layer of mulch around the base of the plant to conserve moisture, keep the soil cool, and suppress weeds. Avoid piling mulch against the stems of the plant.
Summary:
Hebes are relatively low-maintenance shrubs that are well-suited to sunny borders, containers, and even coastal gardens. They are best suited for regions with mild winters and relatively warm summers, as they are somewhat frost-sensitive. By ensuring proper sunlight, soil drainage, and periodic pruning, you can enjoy the attractive foliage and blooms of Hebes throughout the growing season.
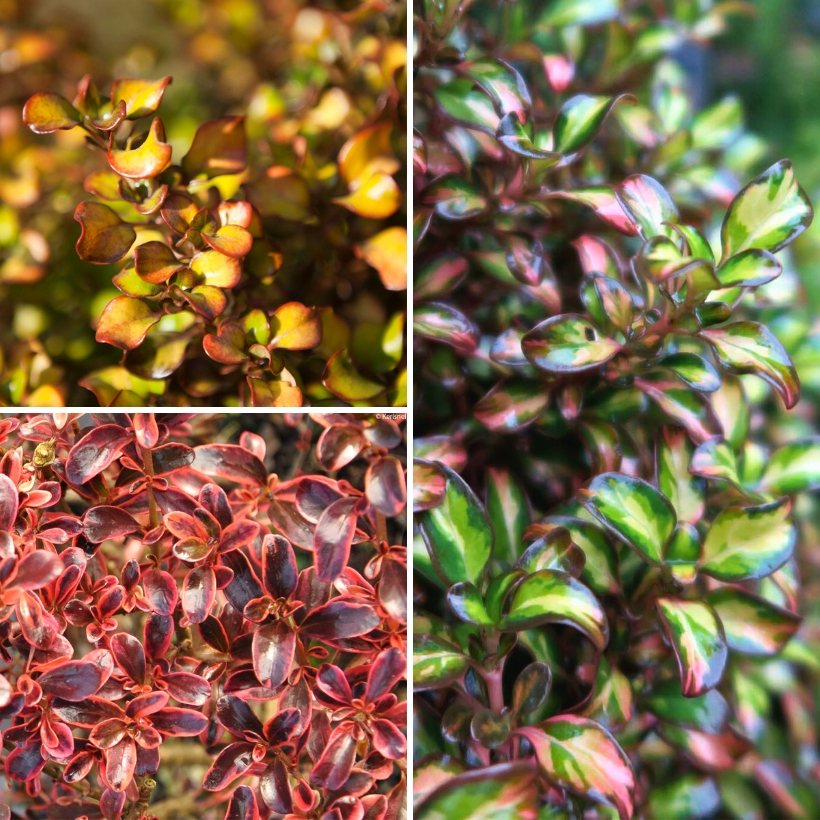
Coprosma is a genus of evergreen shrubs and small trees, native to New Zealand, Australia, and the Pacific Islands. Known for their glossy, colorful leaves and striking appearance, Coprosma plants are often used as ornamental hedges or in landscaping. Some varieties have vibrant foliage with red, orange, or yellow hues, while others have variegated patterns. They are relatively easy to care for, making them great for gardeners seeking a low-maintenance shrub. Here are some popular Coprosma species and cultivars along with their care tips:
Popular Coprosma Species and Cultivars
- Coprosma repens (Mirror Bush)
- Appearance: C. repens is a commonly grown species with glossy, dark green or variegated leaves that can have shades of orange, red, or yellow. It can grow as a shrub or small tree, with a dense, bushy habit.
- Growing Zone: USDA Hardiness Zones 9-11
- Care:
- Prefers full sun to partial shade.
- Thrives in well-drained, fertile soil. It is tolerant of most soil types.
- Water regularly but allow the soil to dry out between waterings, as it doesn’t like soggy roots.
- Light pruning in spring or late summer can help maintain shape.
- Tolerant of salt, making it suitable for coastal gardens.
- May require some winter protection in colder areas.
- Coprosma ‘Tequila Sunrise’
- Appearance: This cultivar is known for its vibrant, variegated leaves that transition from bright green to gold and orange hues, creating a dramatic, colorful display. It’s a compact shrub that works well in containers or as a low hedge.
- Growing Zone: USDA Hardiness Zones 9-11
- Care:
- Prefers full sun for the best color development.
- Needs well-drained soil.
- Regular watering is necessary but avoid letting the plant sit in waterlogged soil.
- Prune lightly to encourage a dense, bushy growth habit.
- Tolerates coastal conditions and is moderately frost-tolerant.
- Coprosma ‘Rainbow Surprise’
- Appearance: This variety features striking, variegated foliage with shades of yellow, green, and orange, making it an attractive ornamental plant. It is compact and bushy, ideal for creating colorful hedges or as a stand-alone feature plant.
- Growing Zone: USDA Hardiness Zones 9-11
- Care:
- Prefers full sun for the most intense color.
- Thrives in well-drained, slightly acidic soil.
- Water regularly, but ensure the soil doesn’t stay too wet.
- Prune to maintain shape and remove any dead or damaged growth.
- Tolerates coastal conditions and salt exposure.
- Coprosma ‘Karo Red’
- Appearance: This variety is particularly noted for its red-tinted, glossy foliage that becomes even more vibrant in the cooler months. It’s a compact shrub, often used for its striking foliage in landscaping.
- Growing Zone: USDA Hardiness Zones 9-11
- Care:
- Prefers full sun to partial shade.
- Grows well in a variety of well-drained soils, but it’s important not to overwater.
- Prune lightly after flowering to maintain the desired shape and to encourage new growth.
- Tolerates some coastal conditions and salt exposure.
- May need protection from frost in colder regions.
- Coprosma acerosa (Broom Coprosma)
- Appearance: This species has long, slender branches and narrow, linear leaves that are green or slightly silverish. It grows as a small shrub and is often used as a ground cover or in rock gardens.
- Growing Zone: USDA Hardiness Zones 9-11
- Care:
- Prefers full sun but can tolerate light shade.
- Grows well in well-drained, moderately fertile soil.
- Needs regular watering, but don’t overwater.
- Tolerates drought once established but benefits from occasional deep watering during prolonged dry periods.
- Can tolerate salt and coastal conditions, making it ideal for coastal gardens.
General Care Tips for Coprosma:
- Sunlight: Most Coprosma varieties thrive in full sun for the best foliage color and growth. Some can tolerate partial shade, but they may not show their vibrant colors as well in low light.
- Soil: Coprosma plants prefer well-drained soil and can tolerate a variety of soil types, including slightly acidic to neutral soil. They do best in moderately fertile soils but can adapt to less fertile conditions as long as drainage is good.
- Watering: While Coprosma plants are somewhat drought-tolerant once established, they perform best with regular watering. Allow the soil to dry out between waterings, as these plants do not like soggy roots. Overwatering can lead to root rot.
- Pruning: Regular light pruning is recommended to maintain shape and prevent the plant from becoming too leggy. Prune back any dead or damaged branches, and trim lightly after flowering to encourage a bushier growth habit. Coprosma can tolerate hard pruning if needed.
- Fertilizing: Fertilize once in early spring with a balanced fertilizer to encourage healthy growth. Fertilizing too frequently is not necessary for Coprosma plants, as they are relatively low-maintenance.
- Winter Care: Coprosma is typically not frost-tolerant, especially in the colder varieties, so it may require protection during the winter months in regions that experience frost. Consider providing frost cloth or moving potted plants to sheltered areas during cold snaps.
- Pests and Diseases: Coprosma is generally resistant to pests and diseases, but occasional issues with aphids or scale insects may arise. In humid environments, fungal diseases like powdery mildew may occur, so ensure good air circulation and avoid overhead watering to reduce humidity around the plant.
- Mulching: Apply a layer of mulch around the base of the plant to help retain moisture, control weeds, and keep the roots cool in hot weather. Be sure to leave a small gap between the mulch and the base of the plant to avoid rot.
Summary:
Coprosma plants are relatively low-maintenance and adaptable shrubs that thrive in sunny locations with well-drained soil. Their colorful, glossy leaves make them stand out in the landscape, and they are perfect for hedges, borders, or container gardening. Regular pruning, moderate watering, and occasional fertilization will keep your Coprosma healthy and vibrant. However, they should be protected from harsh frost, especially in colder climates. With their tolerance for coastal conditions and unique foliage, Coprosma shrubs are a great addition to any garden.
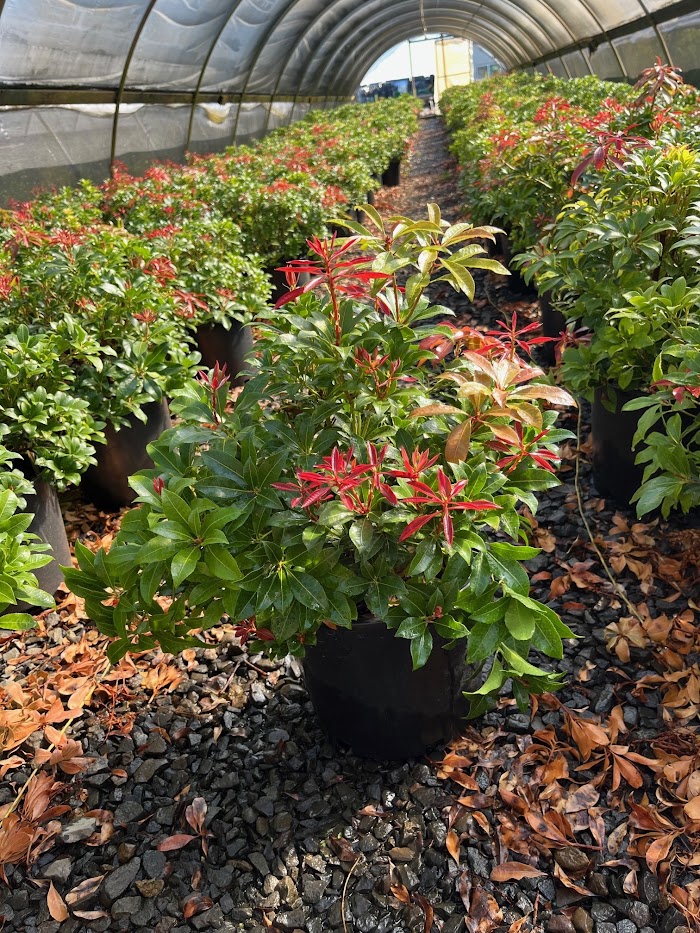
Pieris is a genus of evergreen shrubs commonly known as Andromeda or Japanese Pieris. These plants are highly valued for their attractive foliage, vibrant flowers, and seasonal interest, making them excellent choices for ornamental landscaping. They are particularly popular in temperate climates, where they thrive in acidic soils and shaded areas. Here’s a breakdown of some popular Pieris species and cultivars, as well as general care tips:
Popular Pieris Species and Cultivars:
- Pieris japonica (Japanese Pieris)
- Appearance: Pieris japonica is the most well-known species of Pieris. It has glossy, leathery leaves that are red when young and mature to a dark green. The plant produces clusters of urn-shaped white or pink flowers in early spring. Some cultivars have particularly colorful or variegated foliage.
- Growing Zone: USDA Hardiness Zones 5-8
- Care:
- Prefers partial shade to full shade. It can tolerate some sun but may require extra water in sunnier conditions.
- Thrives in acidic, well-drained soil. It’s important to keep the soil moist but not soggy.
- Regular watering is essential, especially during dry spells, but avoid letting the plant sit in waterlogged soil.
- Prune lightly after flowering to maintain shape and remove any dead or damaged stems.
- Protect from harsh winter winds and frost, especially in colder climates.
- Pieris ‘Valley Valentine’
- Appearance: This cultivar has striking red flowers that appear in early spring, providing a colorful contrast to its dark green leaves. The new growth starts red and gradually matures to dark green. It’s a compact shrub that works well in gardens and containers.
- Growing Zone: USDA Hardiness Zones 5-8
- Care:
- Prefers partial shade to full shade.
- Needs acidic, moist, well-drained soil.
- Water regularly, but ensure the soil drains well to avoid root rot.
- Prune after flowering to maintain shape and prevent leggy growth.
- Avoid direct afternoon sun, which can scorch the leaves.
- Pieris ‘Cavatine’
- Appearance: This is a smaller variety of Pieris with compact growth and brilliant red to bronze foliage when new. It also produces small clusters of white flowers in early spring.
- Growing Zone: USDA Hardiness Zones 5-8
- Care:
- Thrives in partial shade to full shade.
- Prefers well-drained, acidic soil that remains consistently moist but not waterlogged.
- Regular watering and good air circulation around the plant will help prevent fungal diseases.
- Prune lightly after blooming to maintain a compact shape.
- Protect from frost, as it can be sensitive in colder climates.
- Pieris floribunda (Mountain Andromeda)
- Appearance: Native to the Appalachian Mountains, Pieris floribunda has narrower leaves than P. japonica and clusters of small, white flowers. It’s a hardier species, making it better suited for colder climates.
- Growing Zone: USDA Hardiness Zones 4-8
- Care:
- Prefers partial shade or dappled sunlight. In hotter climates, it will benefit from some shade.
- Needs acidic, well-drained soil with consistent moisture.
- Water regularly, ensuring that the roots do not sit in water.
- Prune lightly to maintain shape, and remove spent flowers.
- Tolerates more cold than Pieris japonica but may need some protection from harsh winds and late frosts.
- Pieris ‘Compacta’
- Appearance: A smaller, more compact variety of Pieris japonica, ‘Compacta’ offers dark green foliage with a reddish hue when new. It has white flowers in spring and works well in smaller spaces or containers.
- Growing Zone: USDA Hardiness Zones 5-8
- Care:
- Prefers partial to full shade.
- Grows best in acidic, well-drained, and consistently moist soil.
- Water regularly, especially during dry spells.
- Prune lightly after flowering to encourage compact growth.
- Protect from cold winds in winter, especially in colder regions.
General Care Tips for Pieris:
- Sunlight: Pieris prefers partial shade to full shade, particularly in regions with hot summers. Direct afternoon sun can scorch the leaves, especially in more sun-sensitive varieties. In cooler climates, a location with some sun in the morning and afternoon shade is ideal.
- Soil: Pieris plants thrive in acidic soils (pH between 4.5 and 6.0). The soil should be well-drained, as they don’t like to sit in waterlogged conditions. Adding organic matter like compost or peat moss can help improve soil drainage and acidity.
- Watering: These plants prefer consistently moist soil, but overwatering can lead to root rot. Water regularly, especially during dry periods, but make sure the soil doesn’t become soggy. It’s important to water at the base of the plant to prevent mildew on the leaves.
- Fertilizing: Pieris generally does not require heavy fertilization, but you can apply a balanced, slow-release fertilizer in early spring before new growth begins. Use fertilizers formulated for acid-loving plants, as they are more suited to Pieris.
- Pruning: Light pruning after flowering helps maintain the plant’s shape and size. Remove any dead or damaged stems, and cut back the spent flower clusters to encourage fresh growth. Avoid heavy pruning, as Pieris plants generally do not respond well to severe cutting.
- Winter Care: While most Pieris species are hardy, they may suffer from winter burn if exposed to harsh winter winds. In colder regions, provide winter protection by mulching around the base of the plant and possibly covering it with burlap or frost cloth. Also, avoid planting Pieris in areas prone to late frosts, as the flowers may be damaged.
- Pests and Diseases: Pieris is generally pest-resistant but may occasionally face issues with aphids, scale insects, or lace bugs. Aphids can distort new growth and should be treated with insecticidal soap if necessary. Fungal diseases like powdery mildew may develop in humid conditions, so it’s important to ensure good air circulation around the plant.
- Mulching: Mulch around the base of the plant to retain moisture, suppress weeds, and protect the roots from temperature extremes. Avoid piling mulch directly against the stem, as this can lead to rot.
Summary:
Pieris is an excellent choice for gardeners looking for a beautiful, low-maintenance shrub that offers seasonal interest with its colorful new growth and spring flowers. It thrives in acidic, well-drained soil and prefers partial to full shade. Regular watering and light pruning will keep Pieris healthy and looking its best. With its ornamental appeal and relative resistance to pests and diseases, Pieris is a great addition to shaded gardens or woodland landscapes.
Brugmansia, also known as Angel’s Trumpet, is a striking, fast-growing tropical plant known for its large, fragrant, trumpet-shaped flowers. Here’s a complete care guide:
🌞 Light Requirements
- Full sun to partial shade: Needs at least 5 hours of sunlight daily. In very hot climates, provide some afternoon shade to prevent leaf scorch.
💧 Watering
- Keep soil consistently moist, especially during hot weather.
- Avoid letting the soil dry out completely or become waterlogged.
- In containers, water daily during the growing season.
🌱 Soil
- Well-draining, fertile soil is ideal.
- Use a rich potting mix if in containers; garden soil should be amended with compost or organic matter.
🌡️ Temperature & Humidity
- Prefers temperatures between 60–85°F (15–29°C).
- Frost-sensitive: Overwinter indoors or in a greenhouse in colder climates (USDA zones 9–11 outdoors).
- Enjoys moderate to high humidity.
🌼 Feeding
- Brugmansia is a heavy feeder.
- Fertilize with a balanced fertilizer (10-10-10 or 20-20-20) every 2 weeks during the growing season.
- Switch to a high-phosphorus fertilizer (e.g., 15-30-15) to encourage flowering.
✂️ Pruning
- Prune in early spring to control size and shape.
- Cut just above a Y-junction of stems for best regrowth.
- Remove dead or damaged branches and spent flowers regularly.
🪴 Container Growing
- Perfect for pots; allows for easy overwintering.
- Choose a large container (at least 5 gallons).
- Ensure excellent drainage.
❄️ Winter Care
- In cold zones, bring indoors before the first frost.
- Reduce watering; allow dormancy if storing in a cool, dark area.
- Alternatively, keep growing under grow lights in a warm room.
⚠️ Toxicity Warning
- All parts are toxic if ingested, especially seeds and leaves.
- Keep away from pets and children.
🌼 Gardenia Care Guide
✅ Quick Overview
- Botanical Name: Gardenia
- Type: Evergreen shrub
- Zones: USDA 8–11 (can be grown indoors elsewhere)
- Known for: Glossy green leaves and fragrant white blooms
🌞 Light Requirements
- Outdoors: Full sun to partial shade. Best with morning sun and afternoon shade.
- Indoors: Place in bright, indirect light (e.g., east or south-facing window).
🌡️ Temperature & Humidity
- Ideal Temperature:
- Day: 65–75°F (18–24°C)
- Night: ~60°F (16°C)
- Humidity: High humidity (50% or more). Use a humidifier or pebble tray indoors.
Avoid: Drafts, heaters, and cold air from windows.
💧 Watering
- Keep the soil consistently moist but not soggy.
- Water when the top 1 inch of soil is dry.
- Use distilled or rainwater (gardenias are sensitive to alkaline tap water).
🌱 Soil
- Needs acidic, well-draining soil
- Ideal pH: 5.0–6.0
- Mix suggestion: 1 part peat moss, 1 part pine bark, 1 part perlite
🌿 Fertilizing
- Use a fertilizer for acid-loving plants (e.g., azalea/camellia fertilizer).
- Feed every 2–4 weeks from spring through summer.
- Stop feeding in fall and winter.
✂️ Pruning
- Prune after flowering to maintain shape and size.
- Remove dead or crossing branches.
- Avoid late-season pruning—buds form on old wood.
🐛 Common Problems
| Symptom | Likely Cause |
|---|---|
| Yellow leaves | Alkaline soil or overwatering |
| Bud drop | Low humidity, temp swings, overwatering |
| No blooms | Not enough light or nutrients |
| Sticky leaves or pests | Aphids, scale, or whiteflies – treat with neem oil or insecticidal soap |
🌸 Bonus Tips
- Repot every 2–3 years if indoors.
- Mulch outdoor plants to retain moisture and regulate soil temp.
- Keep away from concrete foundations that may raise soil pH.
🌼 Lantana Care Guide
✅ Quick Overview
- Botanical Name: Lantana
- Type: Perennial or annual (depending on climate)
- USDA Zones: 8–11 (perennial); grown as annual elsewhere
- Features: Clusters of brightly colored flowers, often changing color as they age
- Attracts: Butterflies, bees, hummingbirds
☀️ Light
- Full sun (at least 6 hours/day) is essential for best flowering
- Can tolerate light shade but will flower less
🌡️ Temperature & Humidity
- Thrives in warm to hot climates
- Heat and drought tolerant once established
- Frost-sensitive – treat as annual or bring indoors in cold climates
🌱 Soil
- Prefers well-draining soil (sandy or loamy)
- Tolerates poor soil but thrives with moderate fertility
- Soil pH: Slightly acidic to neutral (6.0–7.5)
💧 Watering
- Water regularly after planting until established
- Once mature, water only when soil is dry
- Avoid overwatering – soggy soil can cause root rot
🌿 Fertilizer
- Minimal feeding needed
- Too much fertilizer = more foliage, fewer flowers
- Use a balanced, slow-release fertilizer in spring if desired
✂️ Pruning
- Deadhead (remove spent flowers) regularly to promote continuous blooms
- Prune in late winter or early spring to control shape and size
- Can be cut back hard if leggy or overgrown
🐛 Pests & Problems
- Generally pest-resistant, but watch for:
- Whiteflies
- Aphids
- Powdery mildew (if air circulation is poor)
- Toxic to pets and livestock if ingested (especially berries)
🌸 Additional Tips
- Great for containers, borders, or hanging baskets
- Excellent for erosion control on slopes
- Invasive in some regions (e.g., Australia, parts of the southern U.S.) – check local guidelines
🌿 Pittosporum Care Guide
✅ Quick Overview
- Common Names: Pittosporum, Mock Orange, Cheesewood
- Botanical Name: Pittosporum tobira (most common variety)
- Type: Evergreen shrub or small tree
- USDA Zones: 8–11 (some varieties hardy to zone 7)
- Uses: Hedges, foundation plantings, topiary, screens, or ornamental specimens
☀️ Light
- Full sun to partial shade
- Grows best with at least 4–6 hours of direct sun
- Can tolerate more shade, but growth may slow
🌡️ Temperature & Humidity
- Thrives in mild to warm climates
- Can tolerate occasional frost but not prolonged freezing
- Low to moderate humidity is fine—fairly adaptable
🌱 Soil
- Prefers well-drained soil—loamy, sandy, or slightly clay-based
- Tolerates a wide range of soil types
- Soil pH: Neutral to slightly acidic
💧 Watering
- Water regularly during the first growing season to establish deep roots
- Once established: drought-tolerant, only water during extended dry periods
- Avoid overwatering—does not like soggy soil
🌿 Fertilizing
- Not heavy feeders
- Apply a balanced, slow-release fertilizer in early spring if growth seems sluggish
- Optionally, repeat in midsummer for lush growth
✂️ Pruning
- Responds very well to shaping and hedging
- Best time to prune: Late winter to early spring, or immediately after flowering
- Remove dead, crossing, or leggy branches to maintain compact form
🐛 Pests & Diseases
- Generally pest- and disease-resistant
- Occasionally affected by:
- Scale insects
- Aphids
- Sooty mold (often due to pests)
- Treat with neem oil or insecticidal soap if needed
🌸 Varieties
- P. tobira: Dense shrub, fragrant white flowers
- P. tenuifolium: Smaller leaves, upright growth, popular in hedging
- ‘Silver Sheen’ and ‘Variegata’: Decorative foliage options
🏡 Landscape Tips
- Ideal for hedges, windbreaks, screens, or foundation plantings
- Makes excellent container plants in cooler climates
- Tolerates salt spray, making it suitable for coastal gardens