
Installing pavers can be a great way to create a beautiful and durable surface for walkways, patios, driveways, and other outdoor spaces. The installation process is relatively straightforward but requires careful preparation and attention to detail to ensure a long-lasting, stable surface. Here’s a step-by-step guide to help you with paver installation:
1. Planning and Preparation
- Choose Your Pavers: Select the pavers that suit your aesthetic and functional needs. There are various types of pavers, including concrete, brick, stone, and permeable pavers.
- Measure the Area: Measure the area where the pavers will be installed to calculate how many pavers you’ll need. Include a 1/8-inch gap between each paver for joint sand.
- Check the Ground Conditions: If the ground is sloped, make sure the slope is adequate for drainage, generally 1/8 inch per foot to avoid water pooling.
2. Excavation
- Mark the Area: Use stakes and string to outline the area where the pavers will be installed. Make sure the area is squared and the edges are straight.
- Dig the Area: Excavate the area to a depth of about 6 to 8 inches for pedestrian areas and 8 to 12 inches for driveways. This depth will accommodate the base material and paver thickness.
- Ensure Proper Drainage: Maintain a slight slope (1/8 inch per foot) away from structures to ensure water drains off the surface.
3. Prepare the Base
- Compact the Soil: Use a mechanical compactor or hand tamper to compact the soil at the bottom of the excavation. This helps to create a stable foundation for the pavers.
- Add a Layer of Gravel: Spread a 4-inch to 6-inch layer of crushed gravel (also called road base or paver base) across the area. Use a rake to level it, and compact it with the compactor.
- Add Sand Layer: After compacting the gravel, spread a 1-inch layer of course sand on top. This layer will help to level the pavers. Use a screed board (a long, straight board) to level the sand evenly.
4. Laying the Pavers
- Start at a Straight Edge: Start laying your pavers from a corner or edge that is straight and square. This will help maintain consistent alignment as you move through the area.
- Place the Pavers: Lay the pavers in your desired pattern, making sure they are snugly but not tightly against each other. You can use a herringbone, running bond, or basket weave pattern depending on your style.
- Use a Rubber Mallet: As you lay each paver, gently tap it into place with a rubber mallet to ensure it settles into the sand base.
- Check Alignment: Use a string line, level, or square to make sure the pavers are aligned properly and maintain a consistent height.
5. Cutting the Pavers
- Measure and Mark: For the edges, you may need to cut some pavers to fit. Use a measuring tape and mark the pavers with a pencil or chalk.
- Cut the Pavers: Use a wet saw or a paver splitter to cut the pavers. Wear safety goggles and gloves when using power tools.
6. Compact the Pavers
- Compact the Pavers: Once all the pavers are laid, use a mechanical plate compactor to compact them into the sand base. This helps to ensure the pavers settle evenly and lock into place.
- Use a Protective Mat: Place a protective mat on top of the pavers before compacting to prevent damage to the surface of the pavers.
7. Fill the Joints
- Spread Joint Sand: After compacting, spread fine, dry sand over the surface of the pavers. Use a broom to sweep the sand into the joints between the pavers.
- Compact Again: Use the plate compactor again to press the sand into the joints. Sweep additional sand into the joints as needed. Repeat until the joints are filled to the top.
- Clean the Surface: Once the joints are filled, use a leaf blower or broom to clean any excess sand off the surface of the pavers.
8. Finishing Touches
- Edge Restraints: Install edge restraints along the perimeter of the paved area to prevent the pavers from shifting. These can be plastic, metal, or concrete, depending on your preference.
- Water the Surface: Lightly water the surface to settle the sand in the joints and help with stabilization. Let the area dry for a day or two before heavy use.
Tips for Success:
- Ensure Proper Drainage: Always check that your installation has adequate drainage, especially for areas with heavy rainfall or potential water accumulation.
- Consider Climate: If you’re installing pavers in an area with freeze/thaw conditions, ensure the base material is compacted well and that you use polymeric sand to avoid sand shifting over time.
- Quality of Materials: Invest in high-quality pavers and base materials to ensure the longevity and durability of the installation.
- Safety First: Wear appropriate protective gear, such as gloves and goggles, when cutting and handling pavers.
By following these steps, you should have a solid, durable, and visually appealing paver surface. Let me know if you need any more details!
🔍 Types of Paver Sealers
- Water-Based Sealers
- Environmentally friendly and low odor
- Easier cleanup (soap and water)
- Typically offer a matte or natural finish
- Solvent-Based Sealers
- Penetrate deeper and give a “wet look” (glossy finish)
- Often more durable, but stronger fumes
- Require solvent for cleanup
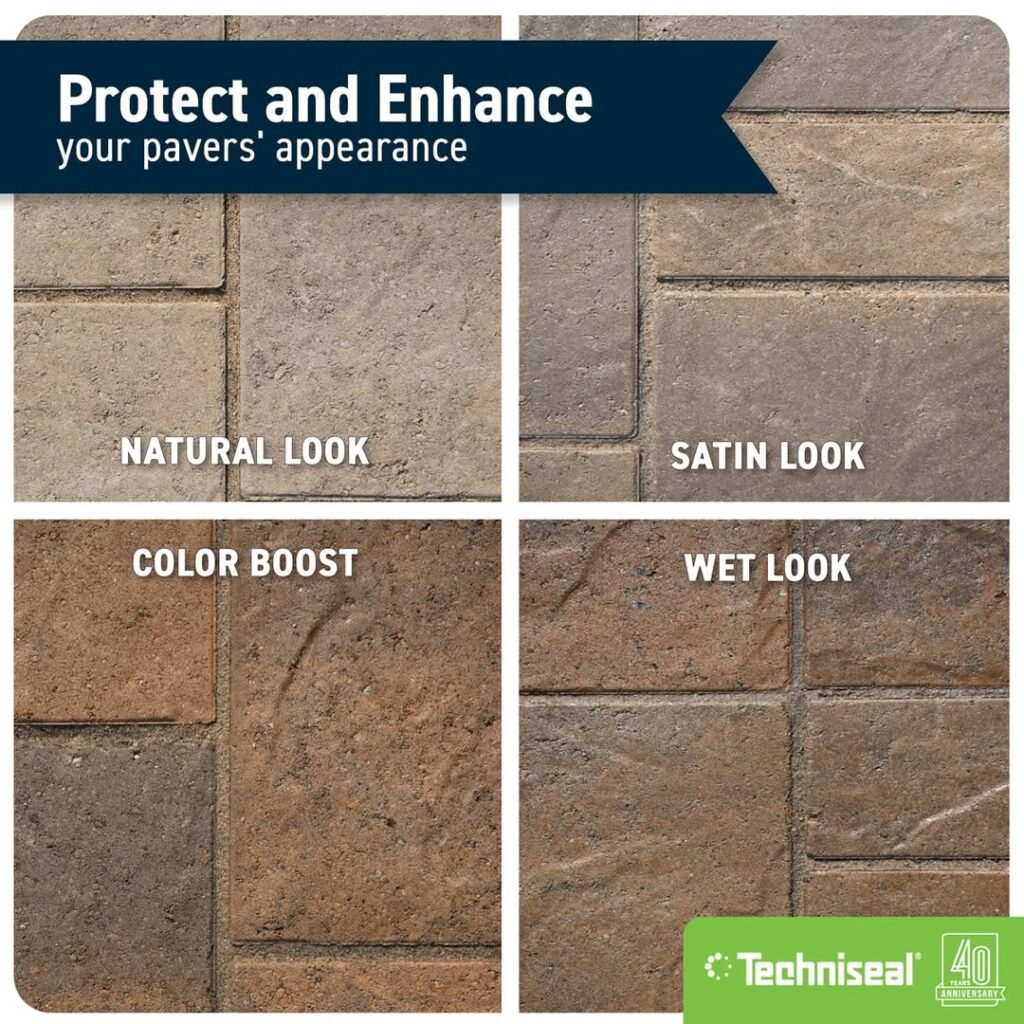
💧 Finish Options
- Natural/Matte: Maintains original look with light protection
- Satin/Semi-Gloss: Slight shine, enhanced color
- High Gloss/”Wet Look”: Darkens color and gives a shiny appearance
🧱 Benefits
- Protects against oil, dirt, and water stains
- Reduces weed/moss growth in joints
- Prevents fading from UV rays
- Makes cleaning easier
- Enhances paver color and appearance
🧰 Application Tips
- Clean thoroughly: Remove dirt, mildew, and efflorescence before sealing.
- Allow to dry completely: Surface should be dry (24–48 hours after washing).
- Apply evenly: Use a sprayer, roller, or brush in thin, even coats.
- Avoid overapplication: Too much sealer can cause a cloudy or sticky finish.
- Cure time: Allow 24–48 hours before heavy use or water exposure.
Would you like me to recommend specific brands of paver sealant (e.g., for driveway, patio, or pool area)?