
GeoWall Pro Y-Max is a type of geogrid reinforcement used in retaining wall construction, designed to provide increased strength and stability for soil retention in both commercial and residential applications. The system typically involves a combination of geogrids, retaining wall blocks, and proper drainage to form a durable, reinforced structure.
Here’s a step-by-step guide on how to install a GeoWall Pro Y-Max retaining wall system:
1. Planning and Preparation
- Check Local Regulations: Before beginning, ensure you comply with any local codes or regulations regarding the construction of retaining walls, especially for taller walls.
- Design the Wall: Plan the height, length, and location of your wall. Factor in necessary slope (usually 1/8 inch per foot away from the wall for proper drainage).
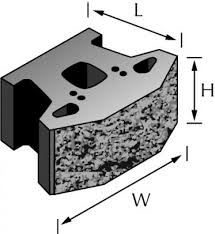
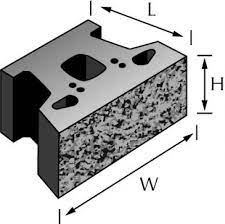
- Select Materials: GeoWall Pro Y-Max geogrids, blocks (such as Allan Blocks or similar), and drainage materials (gravel, filter fabric, and perforated drainage pipe) will be needed.
- Ensure Proper Drainage: Proper drainage behind the wall is essential to prevent water from building up and exerting pressure on the wall. A proper drainage system should be in place (e.g., perforated pipes, filter fabric, gravel).
2. Excavation and Foundation Preparation
- Mark the Area: Use string lines or stakes to mark the desired path of the wall. Ensure the wall follows the intended curve or straight line.
- Excavate the Base: Dig a trench for the first course of retaining wall blocks. The trench should be approximately 6-12 inches deep and wide enough to accommodate the base course of blocks. The depth will vary depending on the wall’s height and type of geogrid used.
- Compact the Soil: Compact the soil at the base of the trench to create a stable foundation. This step is important to ensure that the wall remains stable.
- Add a Gravel Base: Place 4 to 6 inches of crushed gravel or paver base material at the bottom of the trench and compact it. This helps with drainage and stability.
3. Installing the First Course of Blocks
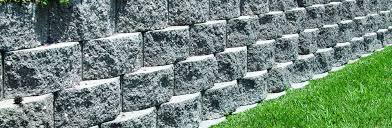
- Place the First Course of Blocks: Lay the first row of retaining wall blocks on top of the gravel base. Ensure the blocks are level both side-to-side and front-to-back. Use a level to check alignment and make adjustments as necessary.
- Check Alignment and Level: Use a string line or a level to make sure the blocks are properly aligned in a straight line or curved pattern as needed.
4. Install GeoWall Pro Y-Max Geogrid
- Place the First Layer of Geogrid: After placing the first course of blocks, it’s time to lay the GeoWall Pro Y-Max geogrid. The geogrid should be placed horizontally and aligned to the back of the blocks. It should extend a sufficient distance into the soil (generally, 2 to 3 feet, depending on the wall height).
- Secure the Geogrid: Ensure that the geogrid is wrinkle-free and lays flat against the soil. It may be anchored or staked into the soil to hold it in place temporarily as you move on to the next course.
- Place the Next Course of Blocks: Lay the second course of blocks on top of the first. Make sure each block is aligned with the previous one and that the geogrid extends between the blocks.
- Overlap the Geogrid: As you move up with each layer, ensure that the geogrid overlaps with the one below by a few inches (usually 6 to 12 inches). This overlapping will ensure that the layers are reinforced properly.
5. Backfill and Compacting
- Backfill with Gravel: After laying each course of blocks and geogrid, backfill with a layer of gravel (drainage material) behind the wall. Compact the backfill in 6-inch layers to prevent settling and shifting.
- Use a Compactor: Use a mechanical compactor to compact the gravel behind the wall after each layer of backfill. This step is important for maintaining stability and preventing the wall from leaning.
- Continue Laying Courses: Repeat the process of placing the blocks, overlapping the geogrid, and backfilling with gravel until you reach the desired height for the wall.
6. Installing Drainage System
- Place a Perforated Pipe: As you build up the wall, ensure you install a perforated drainage pipe behind the wall at the base of the wall. The pipe should be laid in the gravel at the back of the wall to help drain water that might build up behind the wall.
- Use Filter Fabric: Install a filter fabric around the gravel and drainage pipe to prevent soil from clogging the system.
- Ensure Proper Slope: Ensure the pipe has a slight slope (typically 1/8 inch per foot) to direct water away from the wall and toward an appropriate drainage point.
7. Finishing the Wall
- Install the Capstones: Once the desired height is reached, install capstones or top blocks to finish the wall. These blocks are typically placed with mortar or adhesive, depending on the type of wall system.
- Final Backfill and Grading: Complete the backfilling process, grading the soil around the wall to direct water away from the structure. You can also add topsoil or decorative mulch in front of the wall.
- Inspect the Wall: Ensure the wall is straight, level, and secure. Check that the geogrid is properly overlapped, compacted, and in good contact with the soil.
8. Maintenance and Monitoring
- Check for Shifting or Settling: After installation, monitor the wall for any signs of shifting, settling, or bulging. If necessary, backfill and compact again to restore the structure’s stability.
- Maintain Drainage: Ensure that the drainage system behind the wall is kept clear of debris to prevent water buildup, which could damage the wall over time.
Tips for Successful Installation:
- Work in Dry Conditions: Avoid installing the wall in wet conditions to prevent soil or gravel from becoming too muddy to work with.
- Proper Geogrid Installation: Ensure the geogrid is installed flat and taut to provide optimal reinforcement for the wall.
- Use a Laser Level: For higher walls, consider using a laser level to ensure precision and to maintain the correct slope and alignment as you install each course.
- Consult a Professional: If you’re working with a large or complex project (e.g., a high wall or sloped terrain), consider consulting a professional engineer or contractor for advice.
By following these steps, you can install a GeoWall Pro Y-Max retaining wall system that provides strength, stability, and long-term durability for your landscape or construction project.